6R - Multifunction Steering Wheel Retrofit
Posted: Wed Oct 12, 2011 4:02 pm
These instructions are for retrofitting a multifunction steering wheel (MFSW) to a standard non-GTI Polo 6R. For a GTI the retrofit is a lot less complicated, see here.
NB: I live in Finland where cars are left-hand-drive, so all pics and instructions apply to an LHD car. An RHD car can very probably be retrofitted in a similar fashion, but there might be an easier/cleverer place to connect one of the extra wires in an RHD car. More on this further down these instructions.
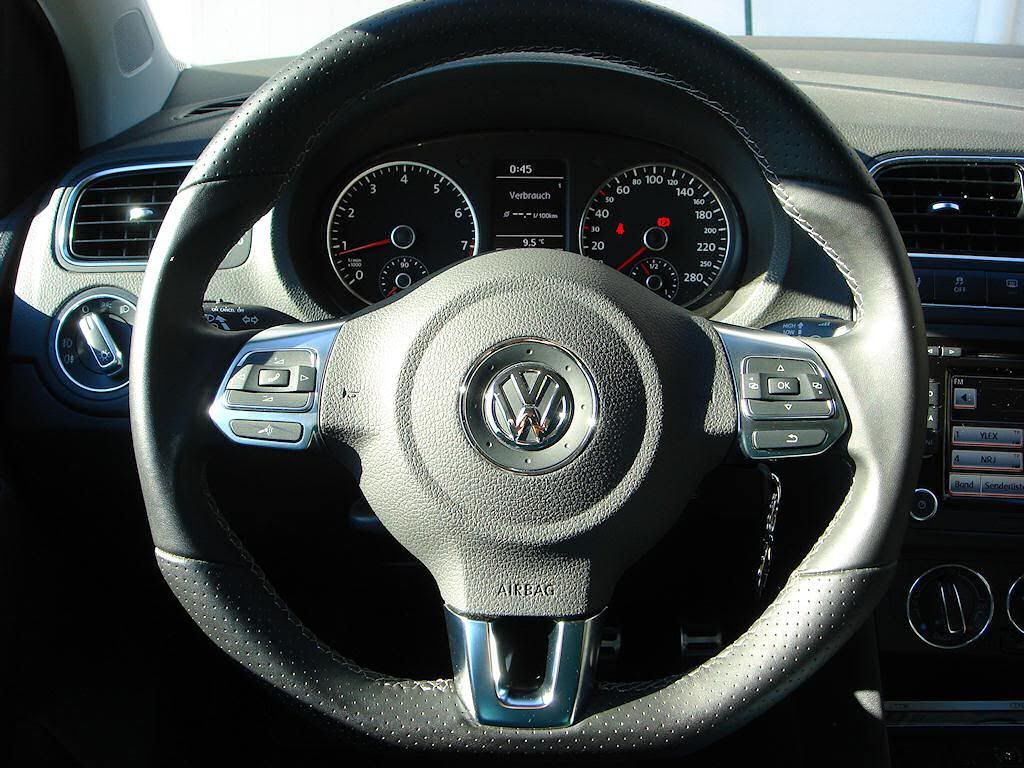
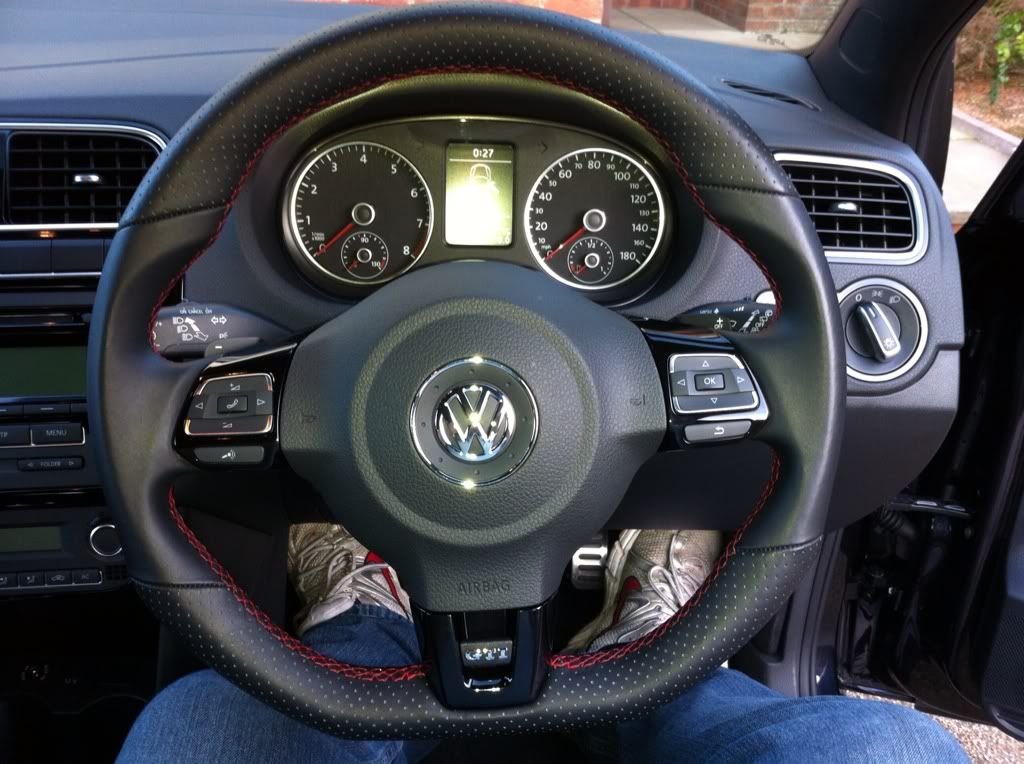
You can retrofit a standard Polo MFSW with just the buttons on the left spoke, or you can use a flat-bottom MFSW from a Golf/Scirocco that has the buttons on both spokes. Or, if you have a standard Polo with the DSG gearbox, then retrofit a Polo GTI MFSW with the gearchange paddles and those will work too! (I can't provide coding help for the latter, but I know it can be done.)
Please note these restrictions and requirements:
- the airbag from a basic round buttonless steering wheel of a standard non-GTI Polo DOES NOT PHYSICALLY FIT into a MFSW of either shape! Therefore you must also get a new airbag and airbag wiring loom suitable for the MFSW.
- two extra wires must be added to the car's electrical system
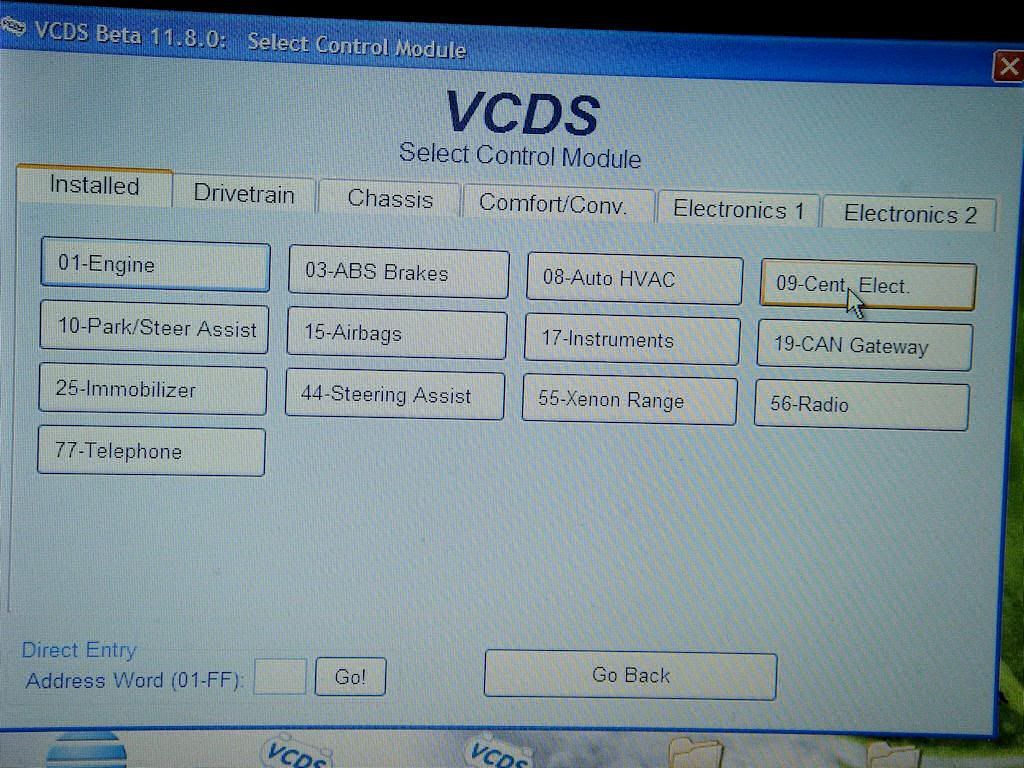
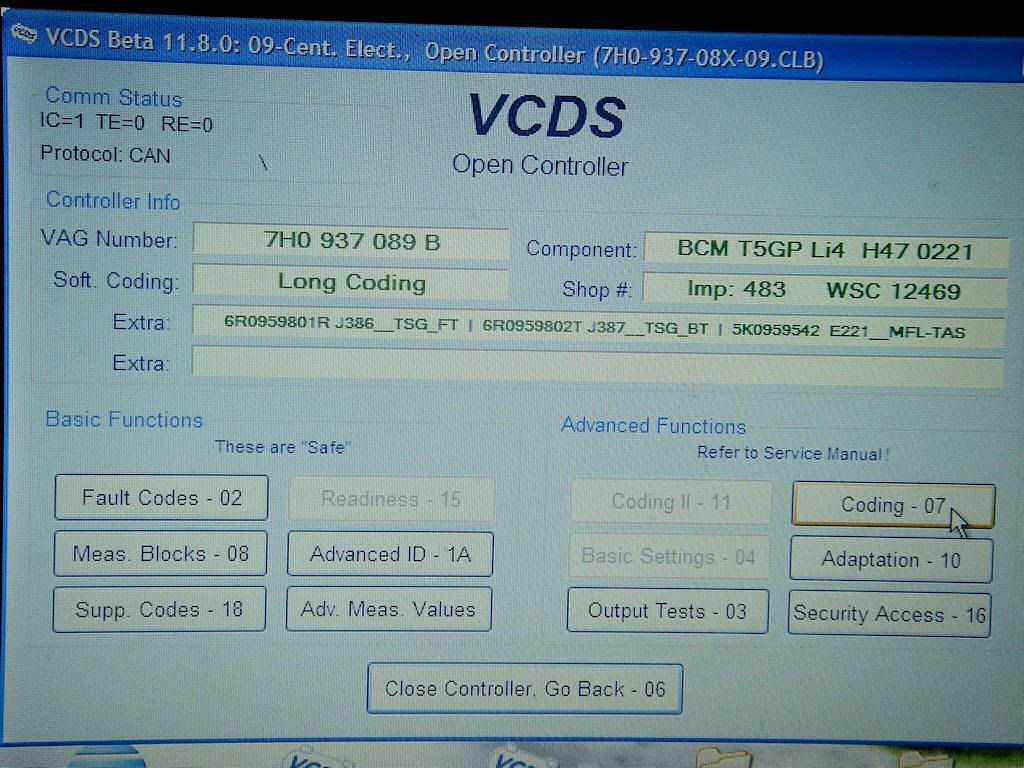
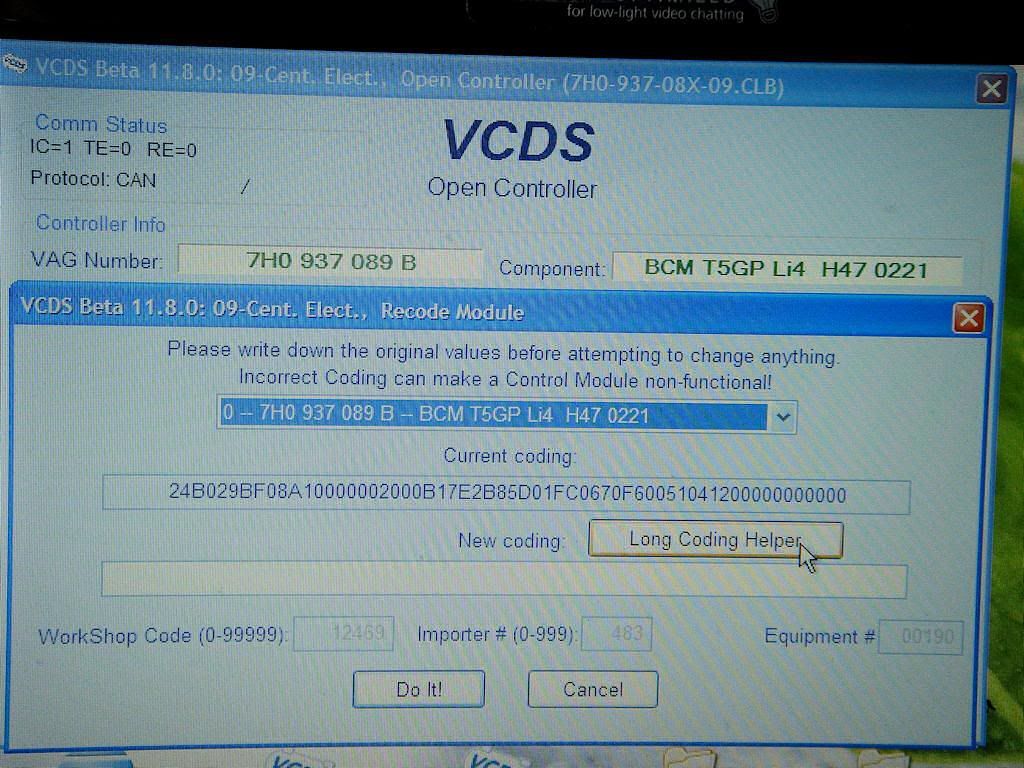
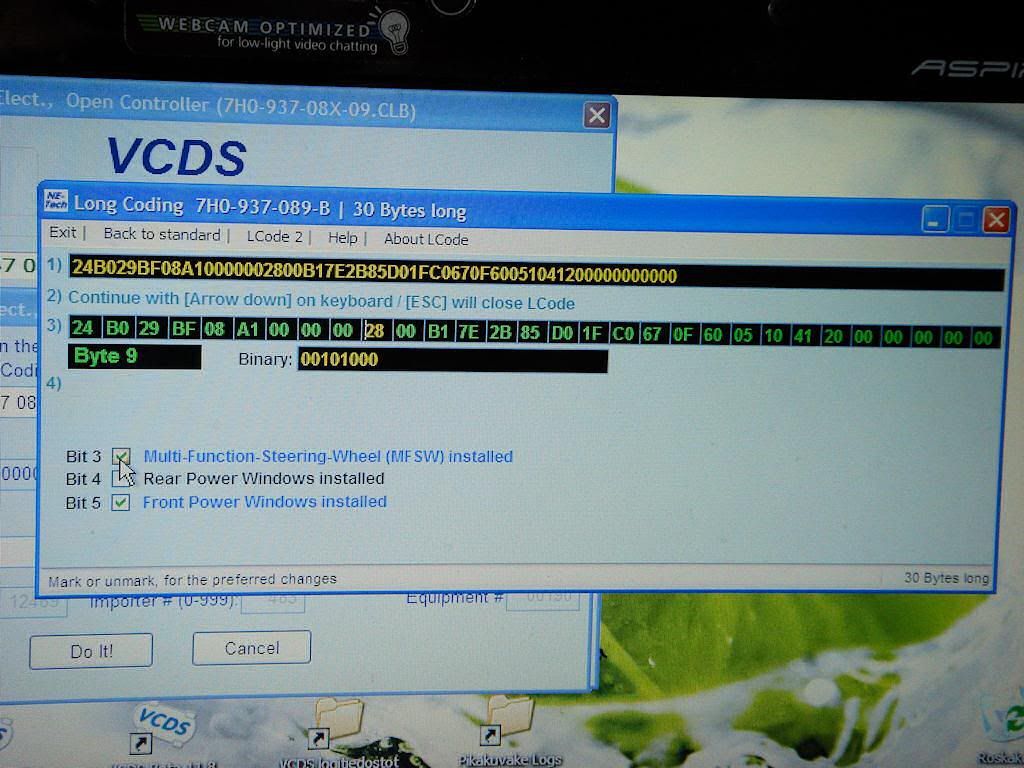
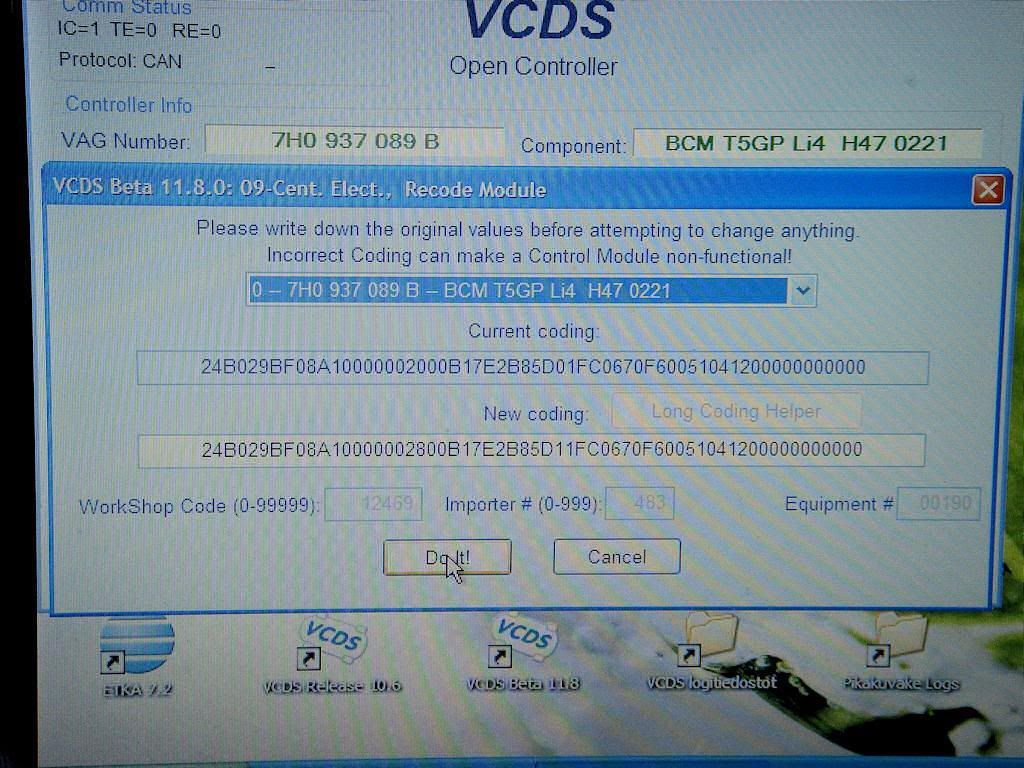
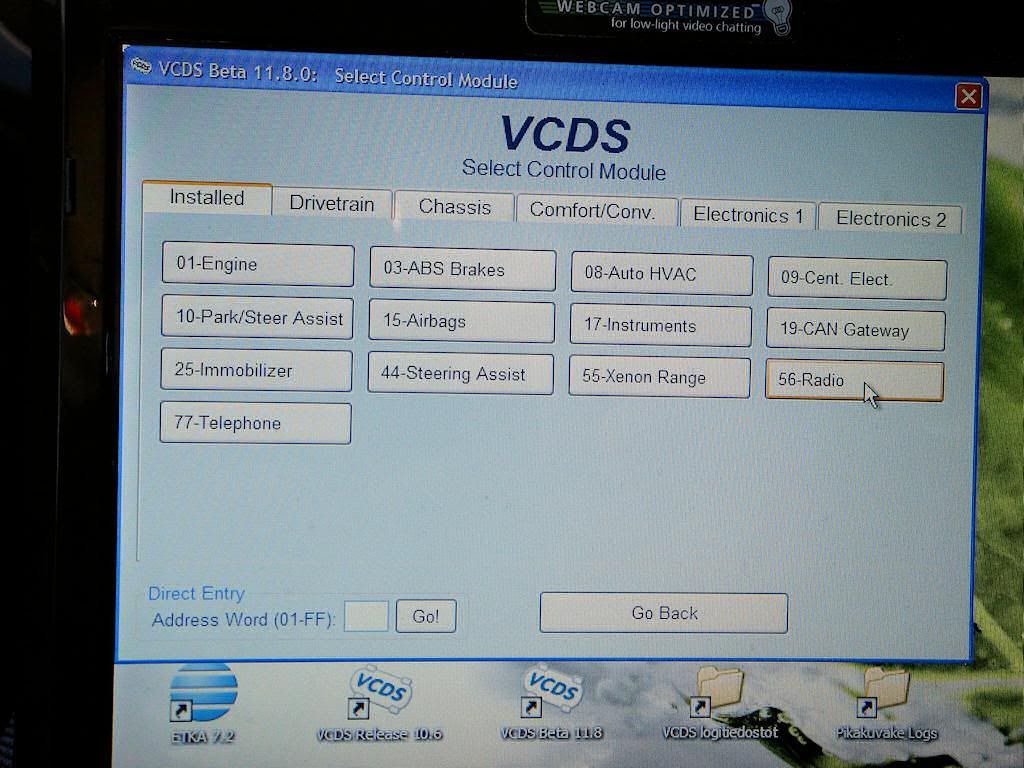
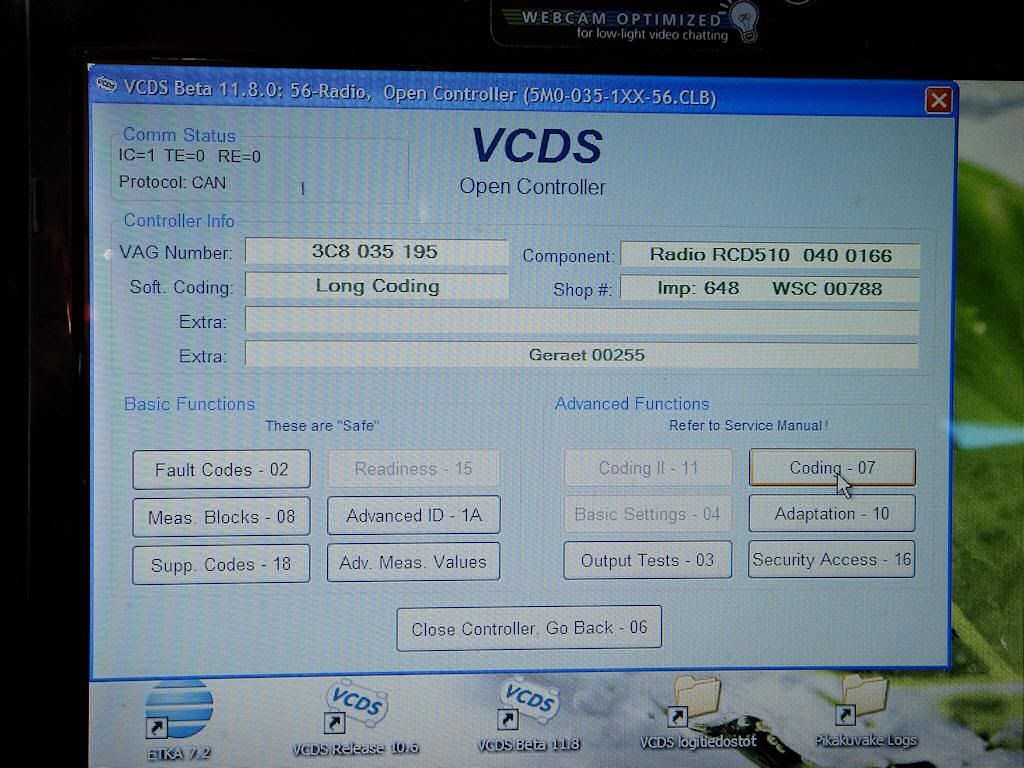
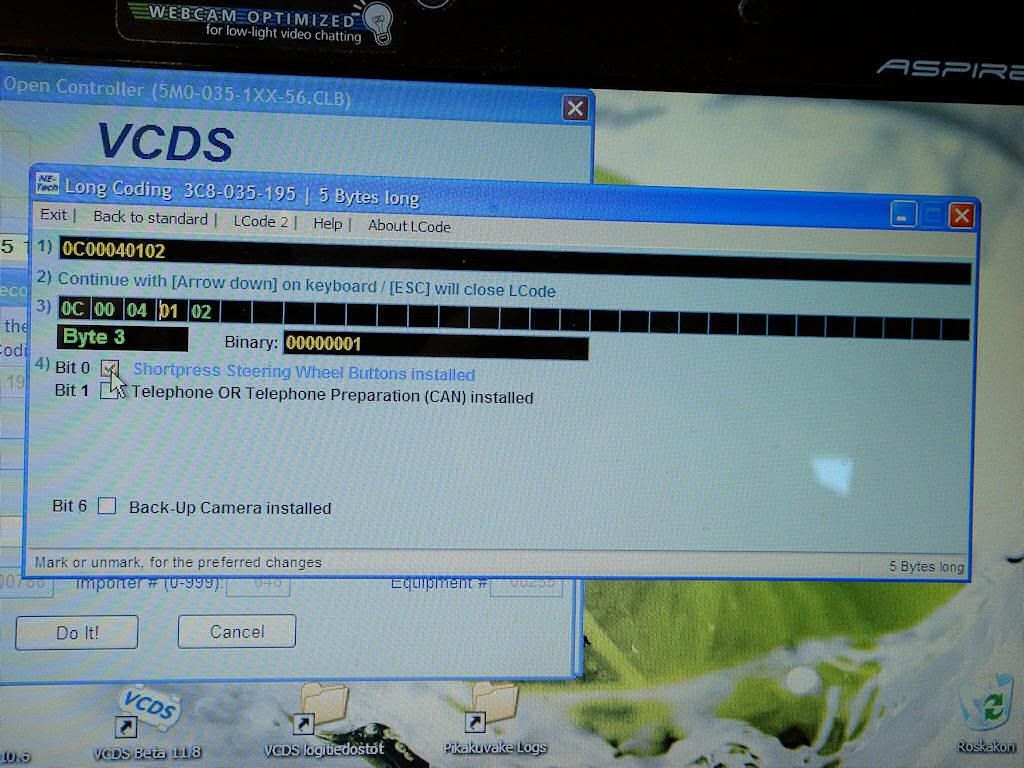
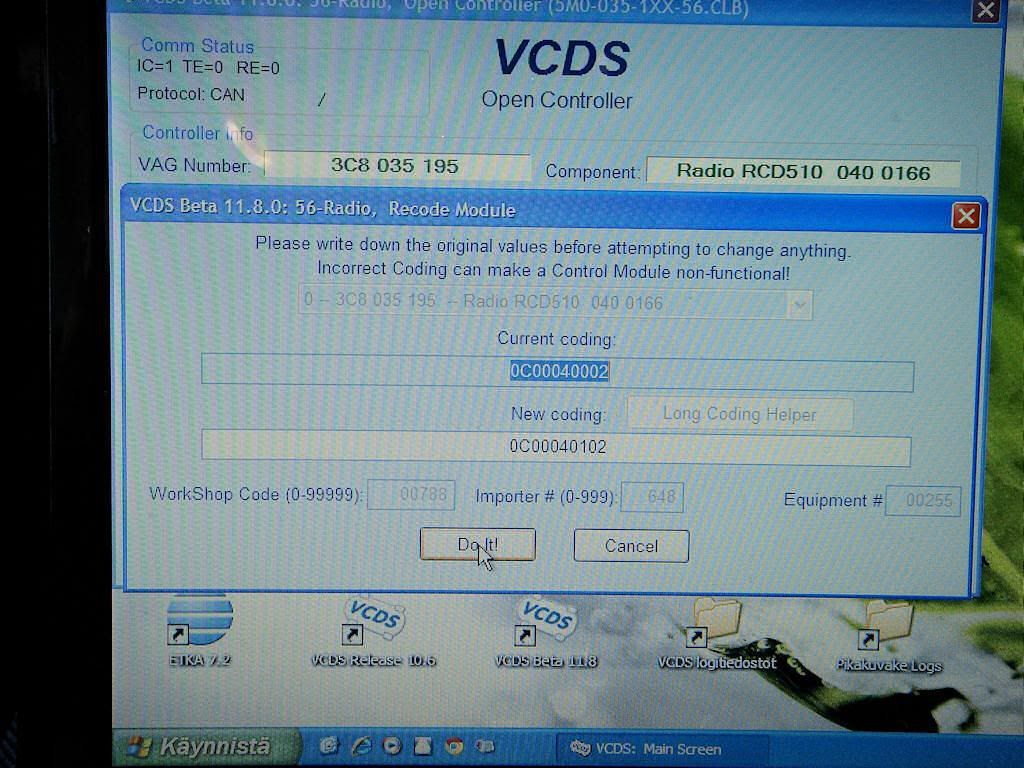
- software coding (using e.g. VCDS) is needed to get the MFSW buttons and horn to function
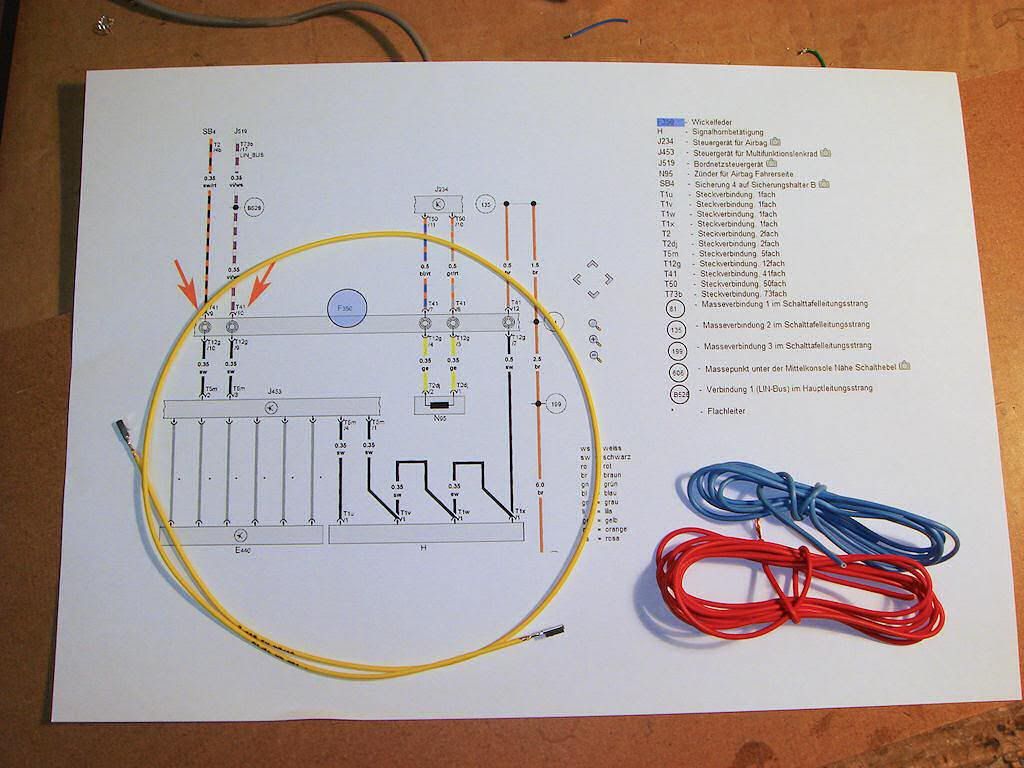
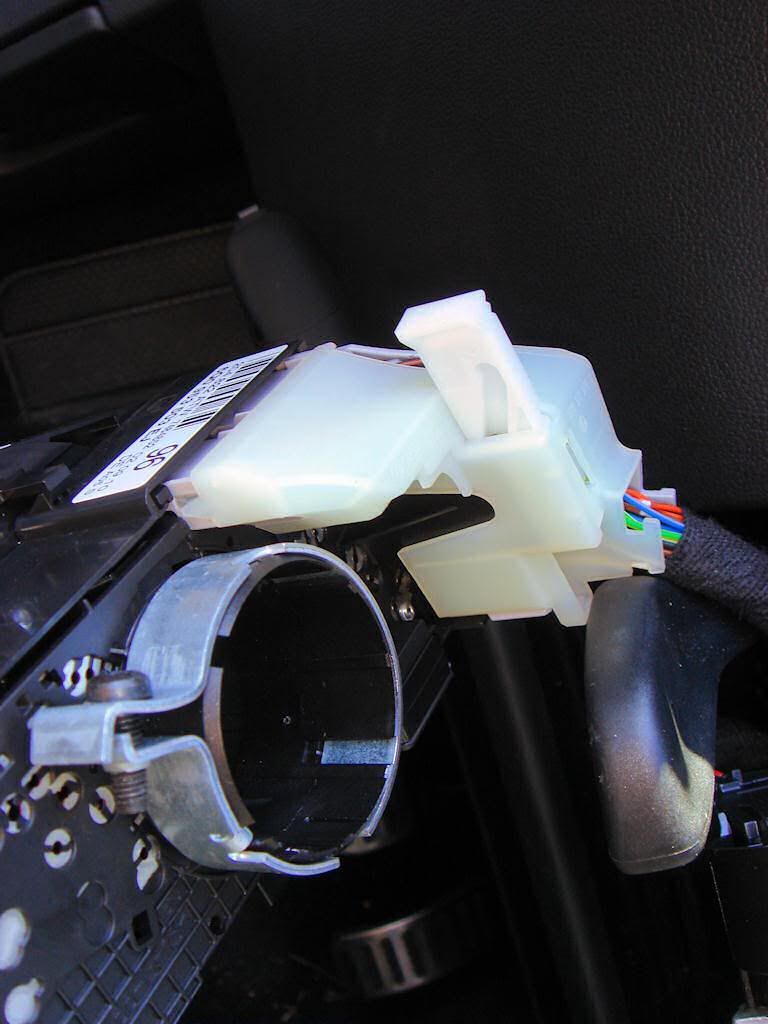
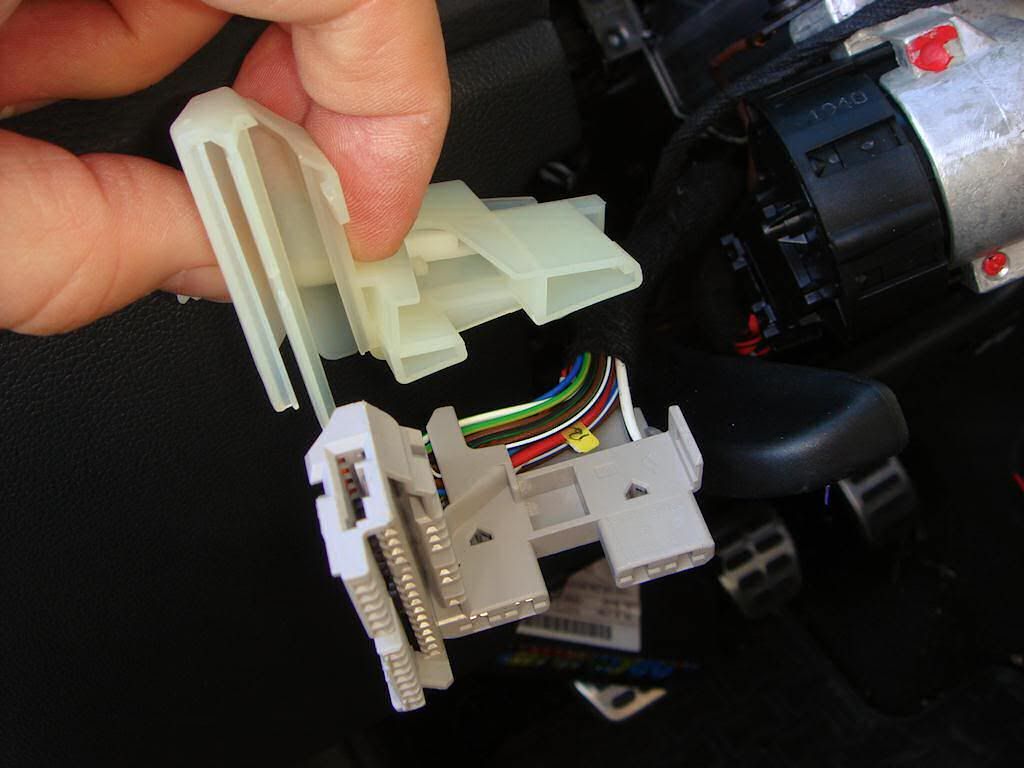
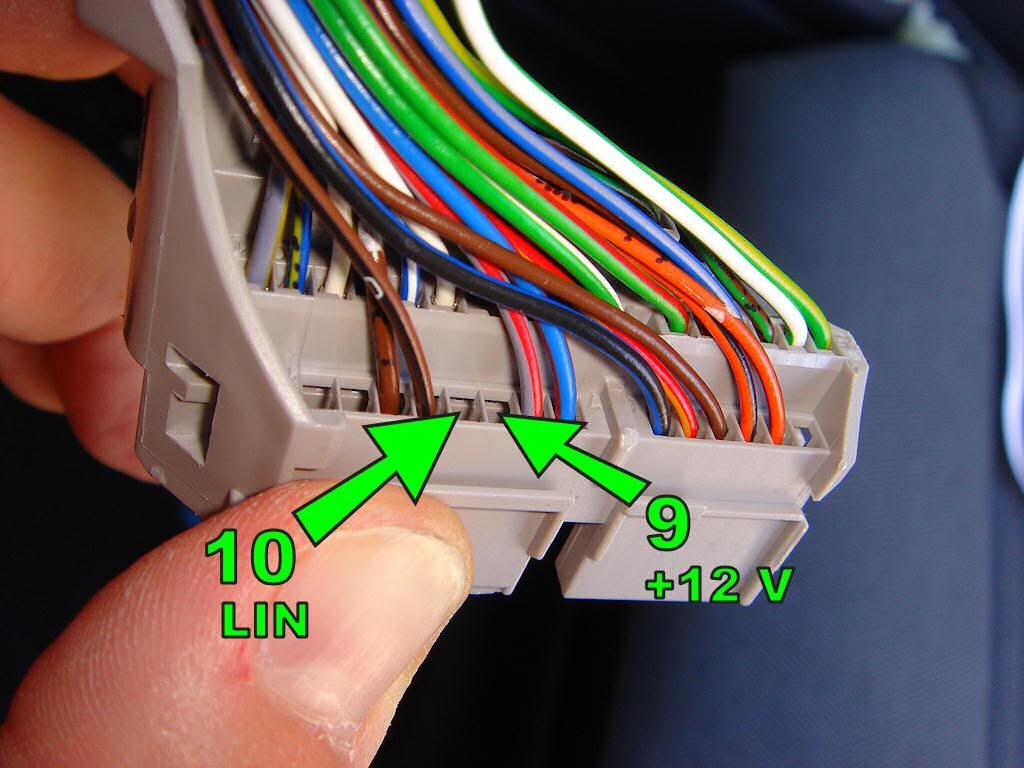
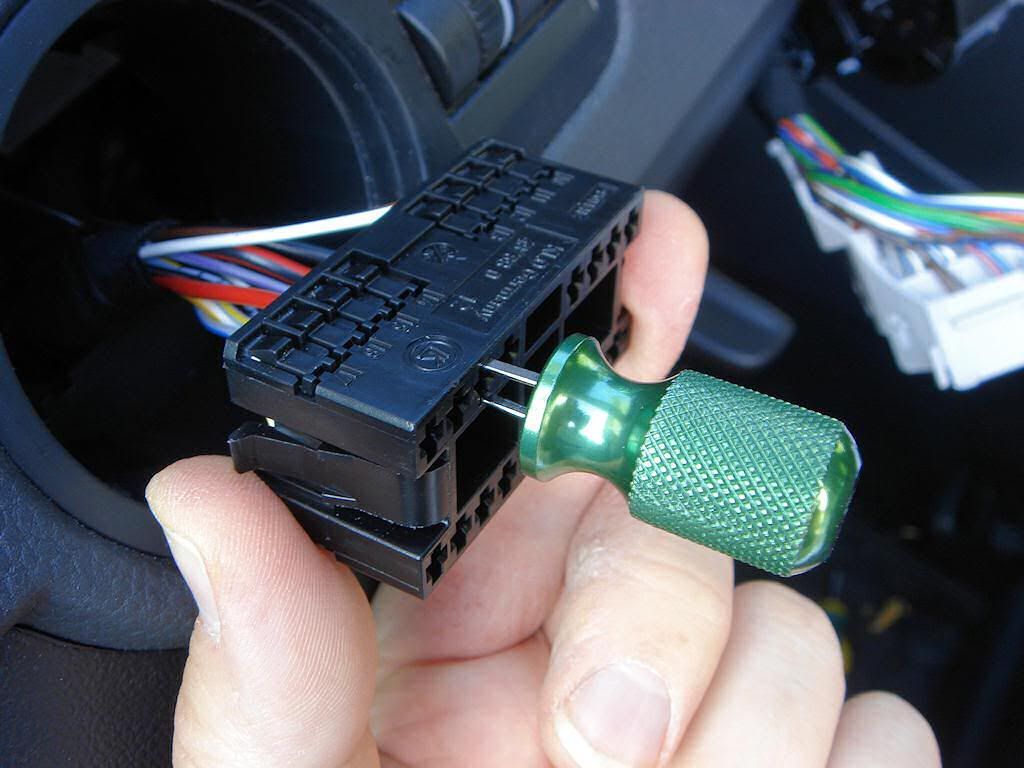
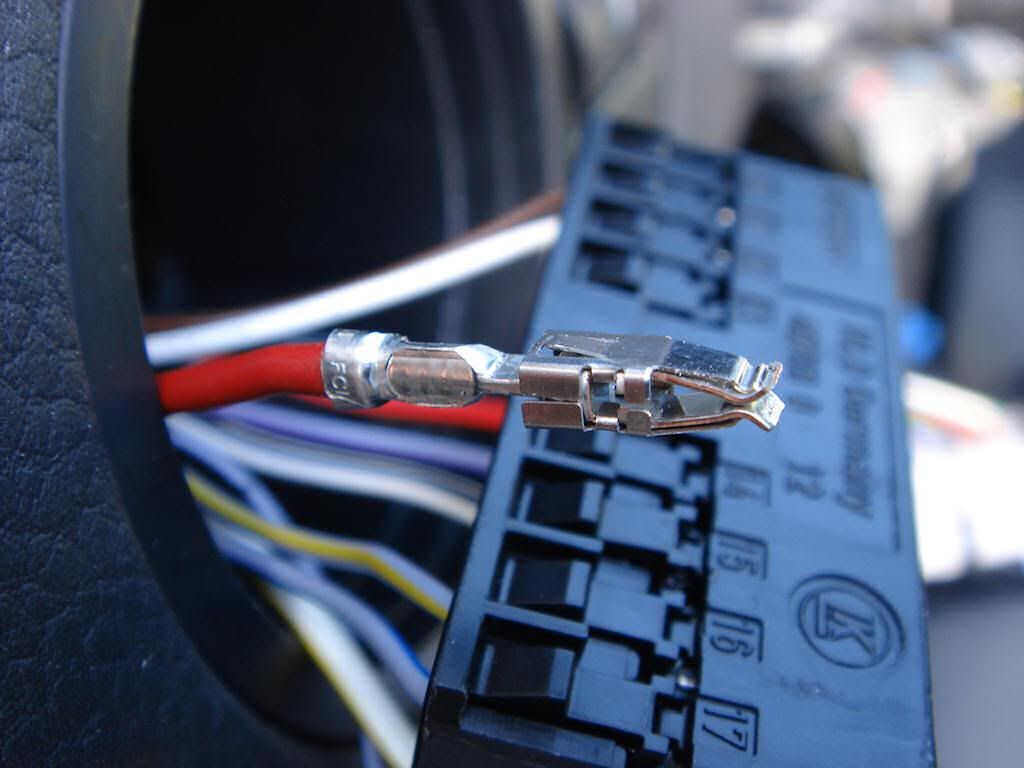
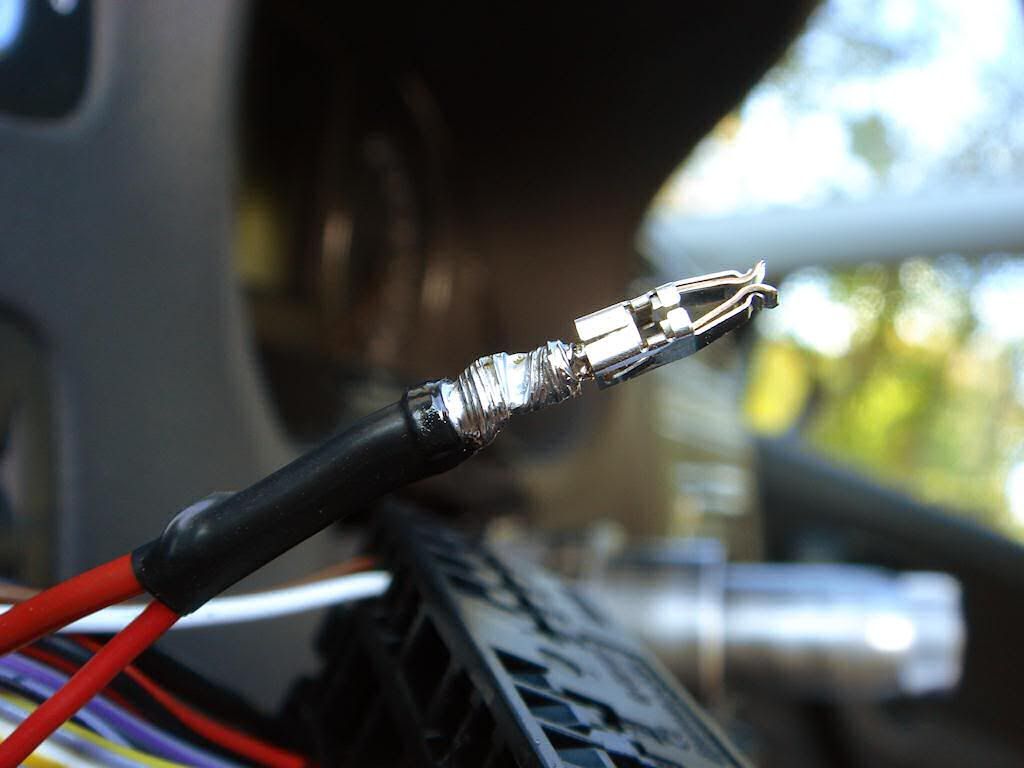
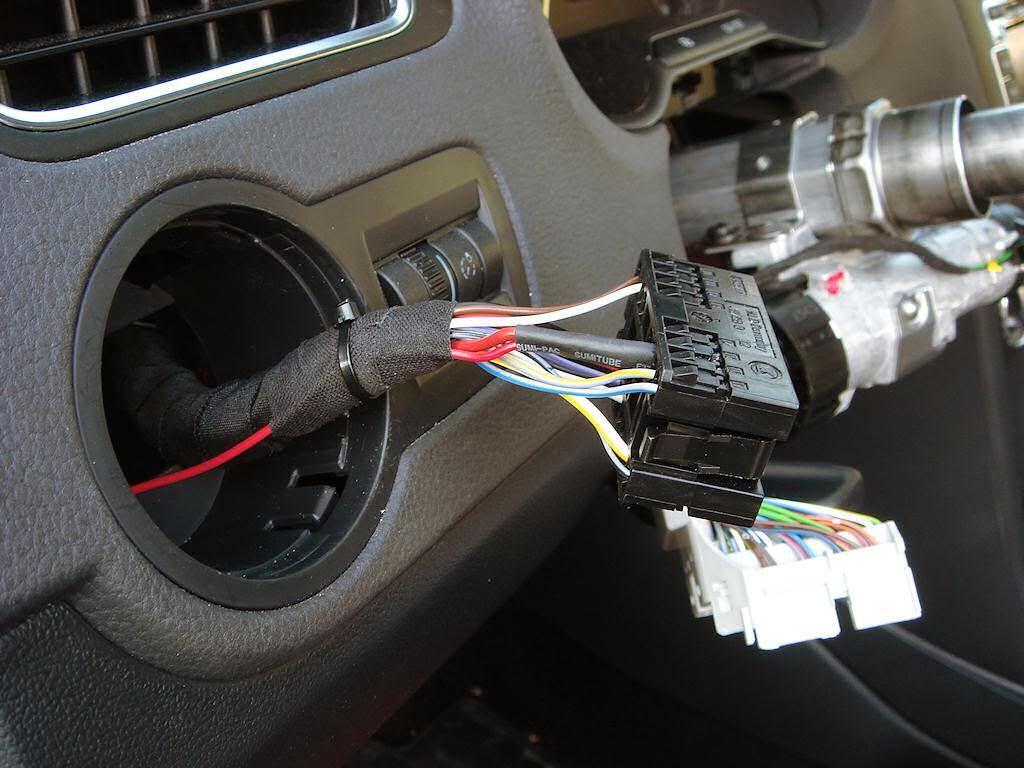
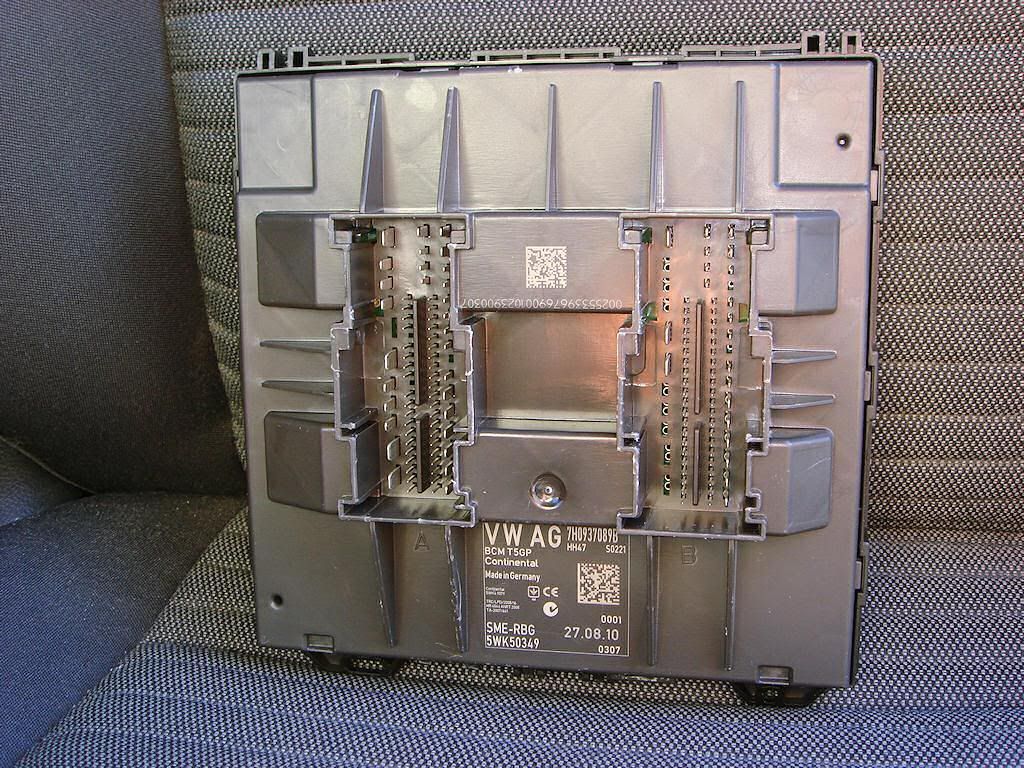
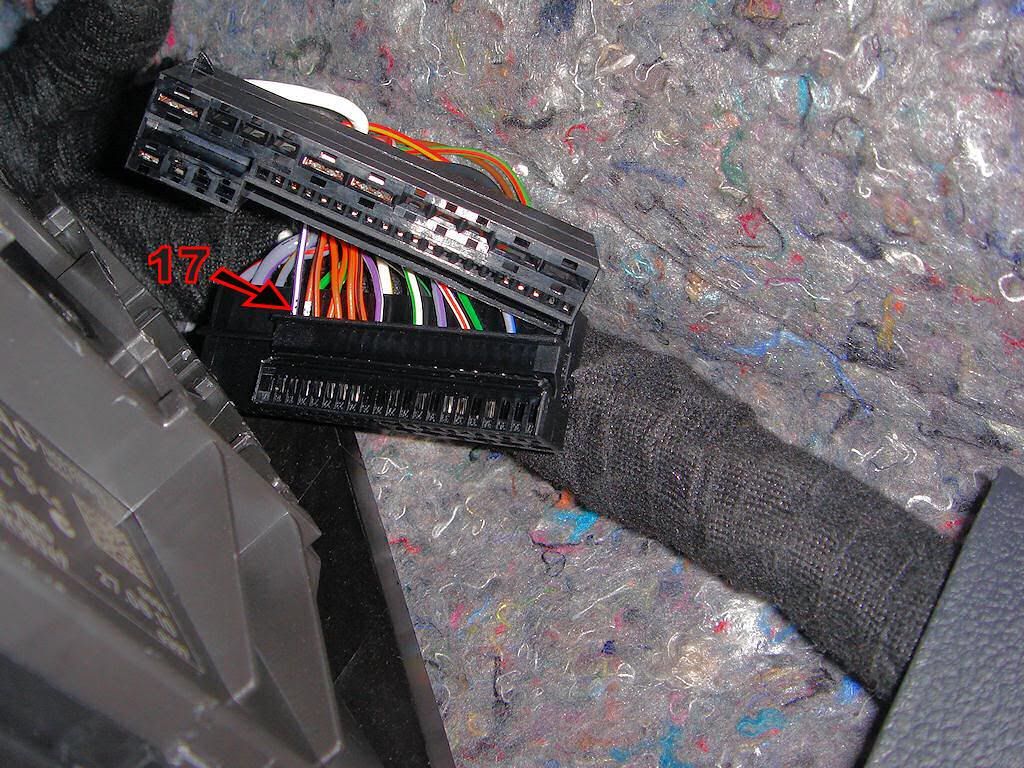
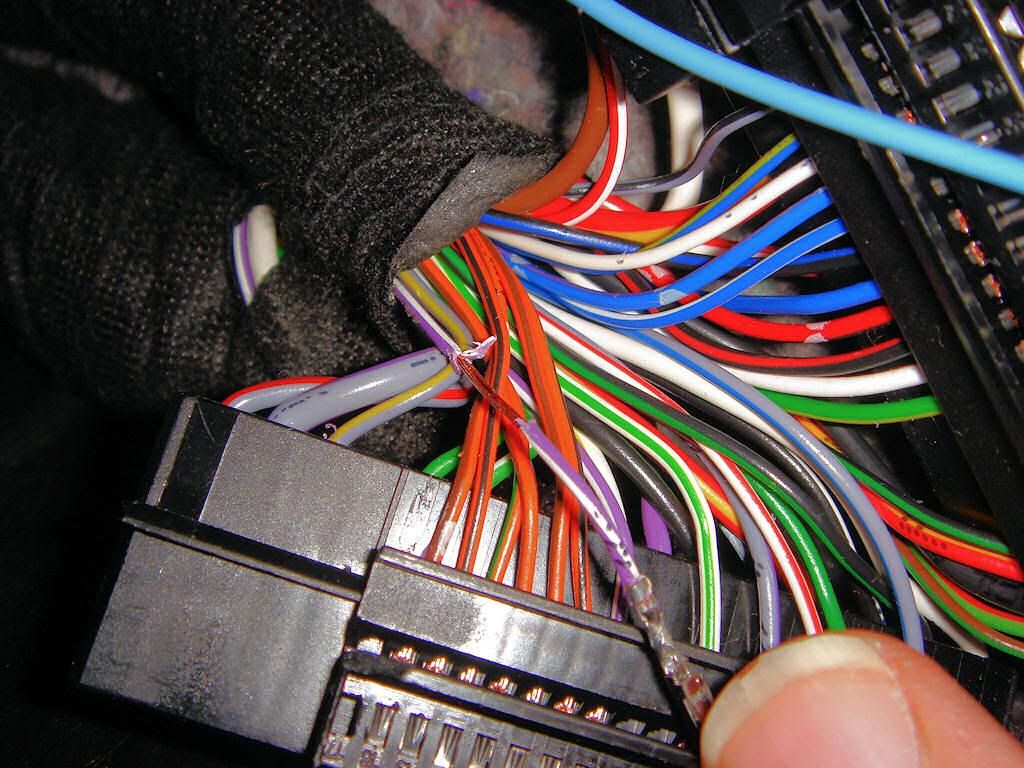
One of the extra wires needed is for the LIN bus that the SW button control module needs to "talk" with other systems of the car. This wire runs from the airbag slip ring / stalk switch connector (T41, pin 10) behind the steering wheel. It's other end goes to the Central Electronics Control Module box J519 (white connector T73b, pin 17).
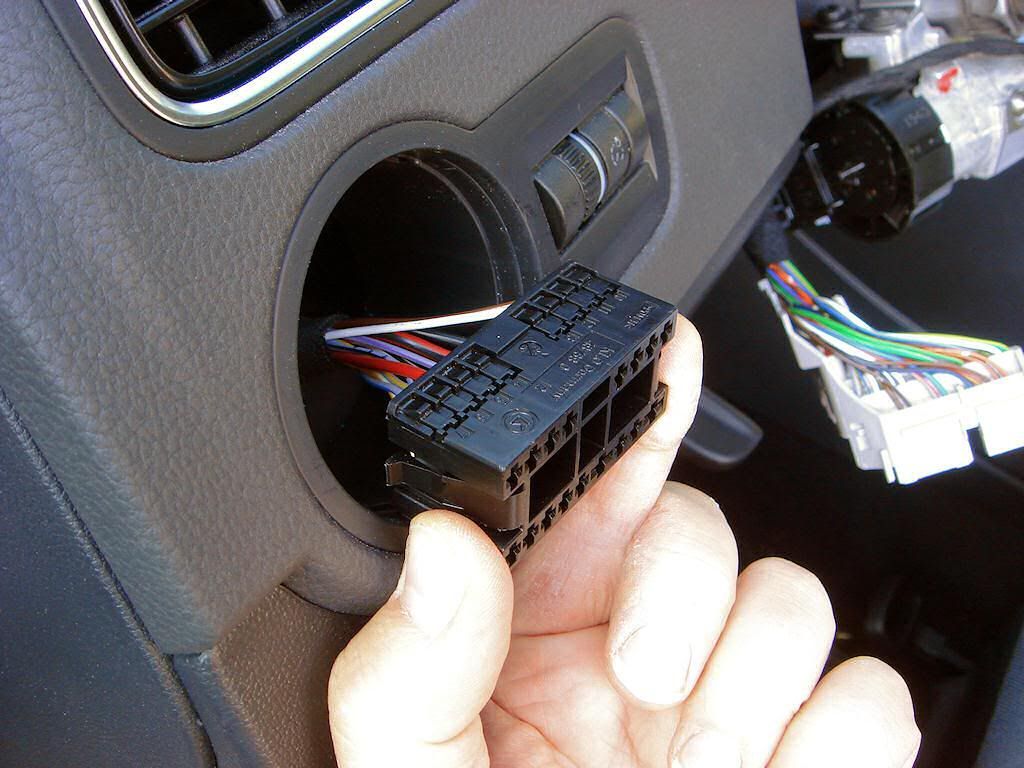
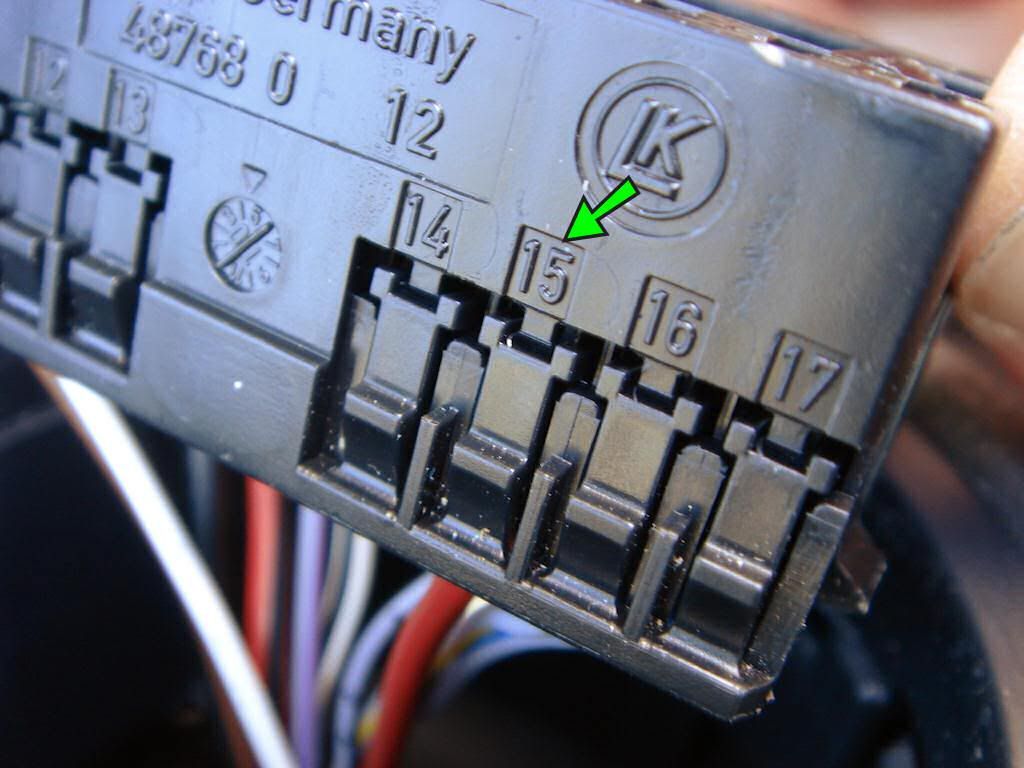
The other extra wire brings continuous +12V to the steering wheel, and runs from the airbag slip ring / stalk switch connector (T41, pin 9). The other end is originally connected to the fusebox, fourth fuse (SB4, 2A) from the left in the upper row. Unfortunately in my case that position was empty, didn't ven have the"claws" that hold a fuse. So I had to find an alternative place to connect the other end of that wire to. The easiest place (in an LHD car at least) is the light switch connector's pin 15.
All clear? Oh well, that's quite alright. Let's begin anyway:
---------------------------------------
Parts, tools and accessories needed, for example:
- MFSW with buttons
- buttons control module with appropriate wiring
- airbag suitable for MFSW
- airbag wiring loom (5K0 971 584 A) with connector for buttons control module
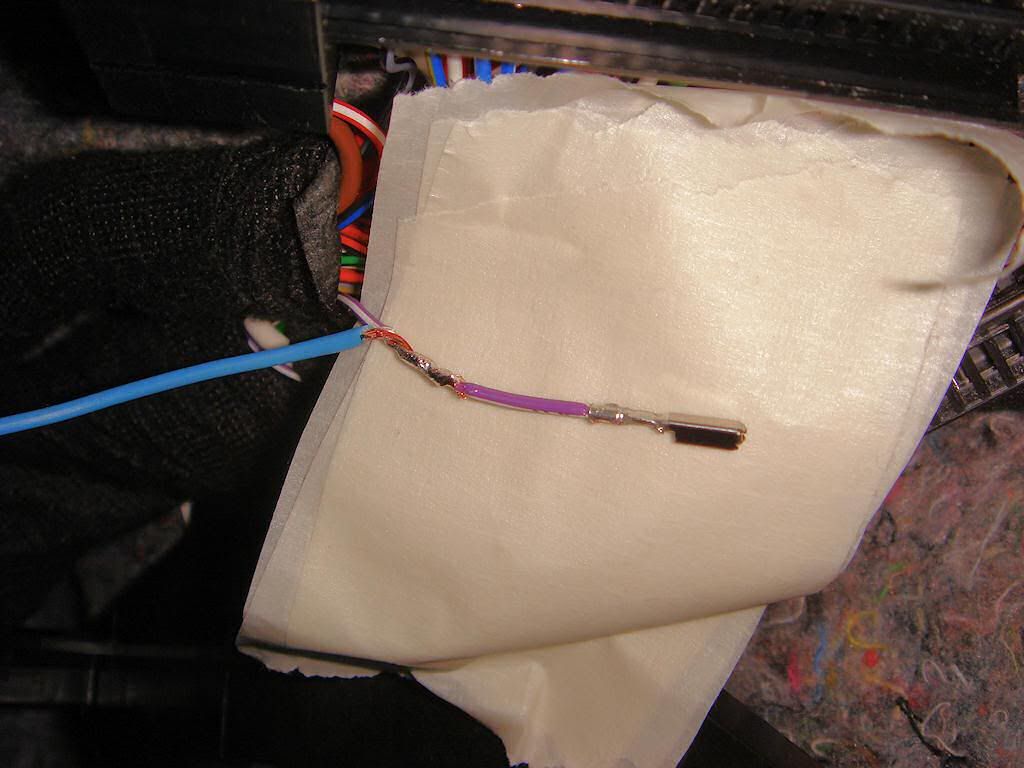
- repair wire (000 979 009 E) with pins suitable for slip ring / stalk switch connector
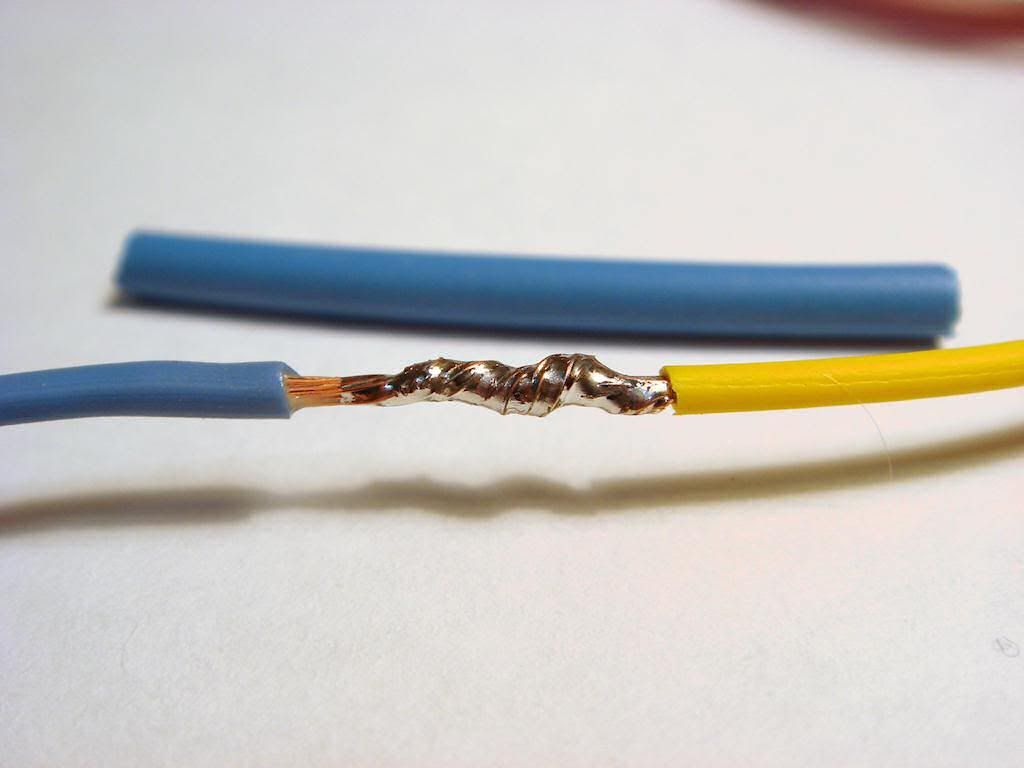
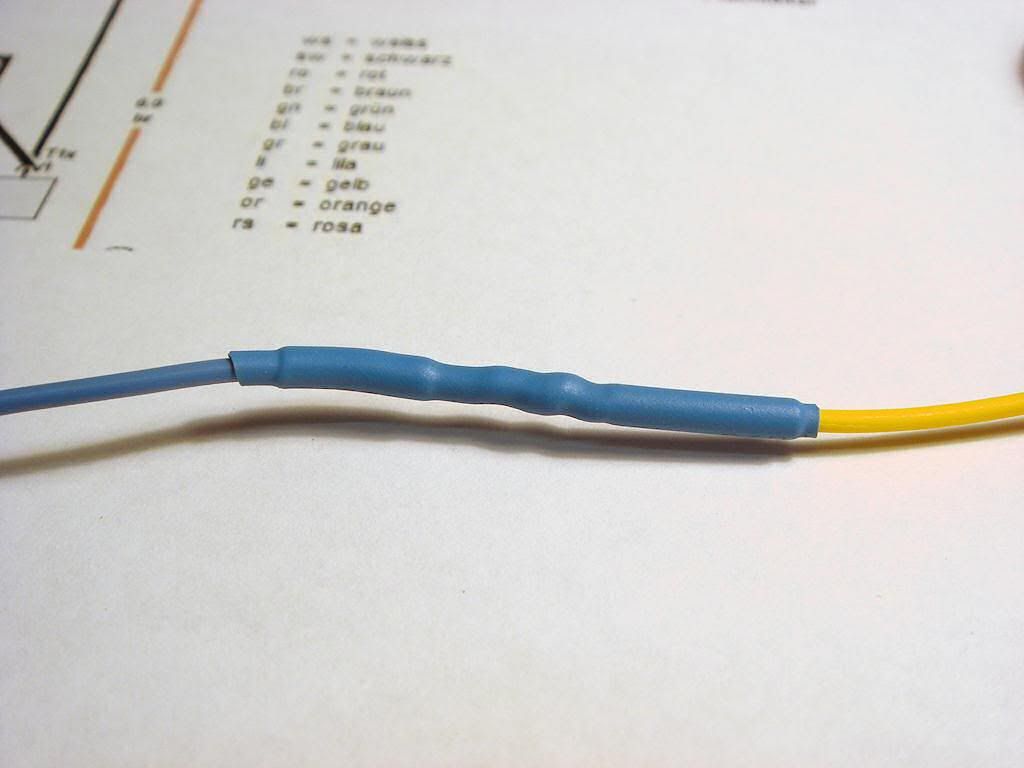
- 0.35...0.5sqmm wire to extend repair wire
- shrink tubing to insulate wire connections
- Torx screwdriver T20 (and optionally T25)
- Torx bit T55
- torque wrench
- tools to make electrical connections (soldering iron, cutting pliers etc.)
- bandage, tranquilisers...
---------------------------------------
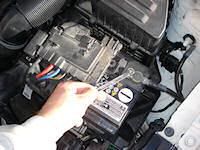
Disconnect the battery earth cable (-).
Insulate the end of the loose cable so that it doesn't conduct electricity, should it for any reason touch the battery minus pole. Before moving on to remove the airbag, wait for at least 15 minutes for any electrical charges in the car's component to discharge.
Sit in the car and touch the metallic door lock counterpiece on the B-pillar, to discharge any electrical charging you might have stored in your clothing. This is to rule out even the remotest theoretical possibility that the potential difference could make the airbag go bang.

Turn the steering wheel 90 degrees from the straight-ahead position.

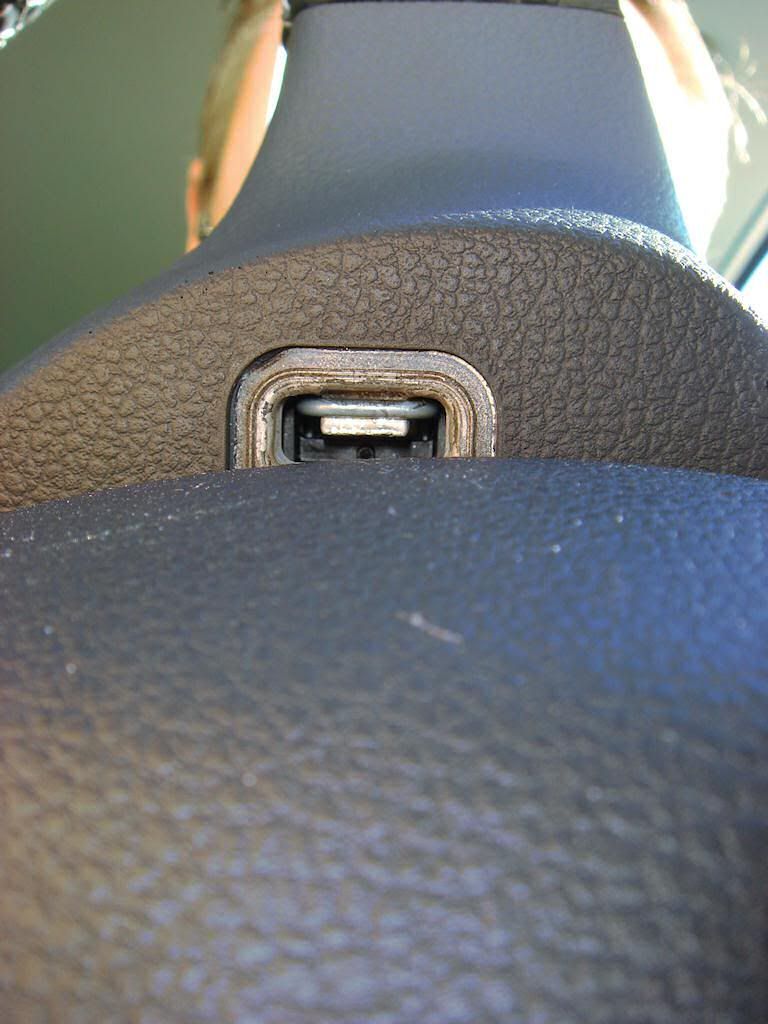
Use a mirror to see a hole on the back of the stering wheel. In that hole you can see one of the airbag retaining loops.
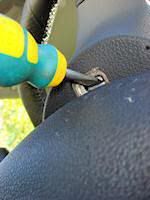
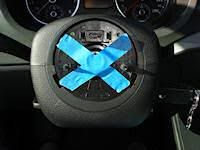
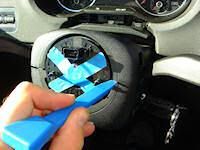
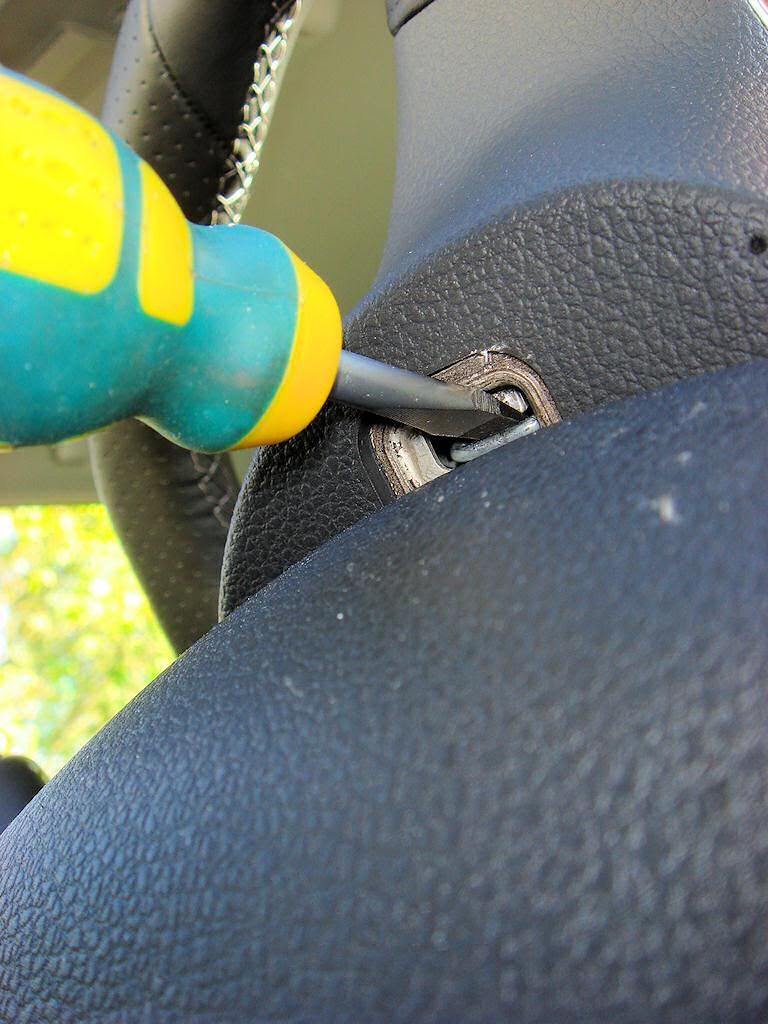
Use a flathead screwdriver to lever the retaining loop around the stud on the steering wheel. Simultaneously, pull from the edge of the airbag towards you.
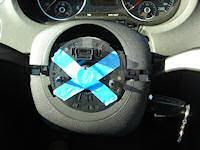
Next, turn the steering wheel 180 degrees and undo the retaining loop on the other side. Then the airbag is free (apart from the wiring).
Hold the airbag in your other hand to prevent it hanging from the wiring. Undo the yellow connector that goes to the slip ring. Pull the white locking piece towards you to free the connector.
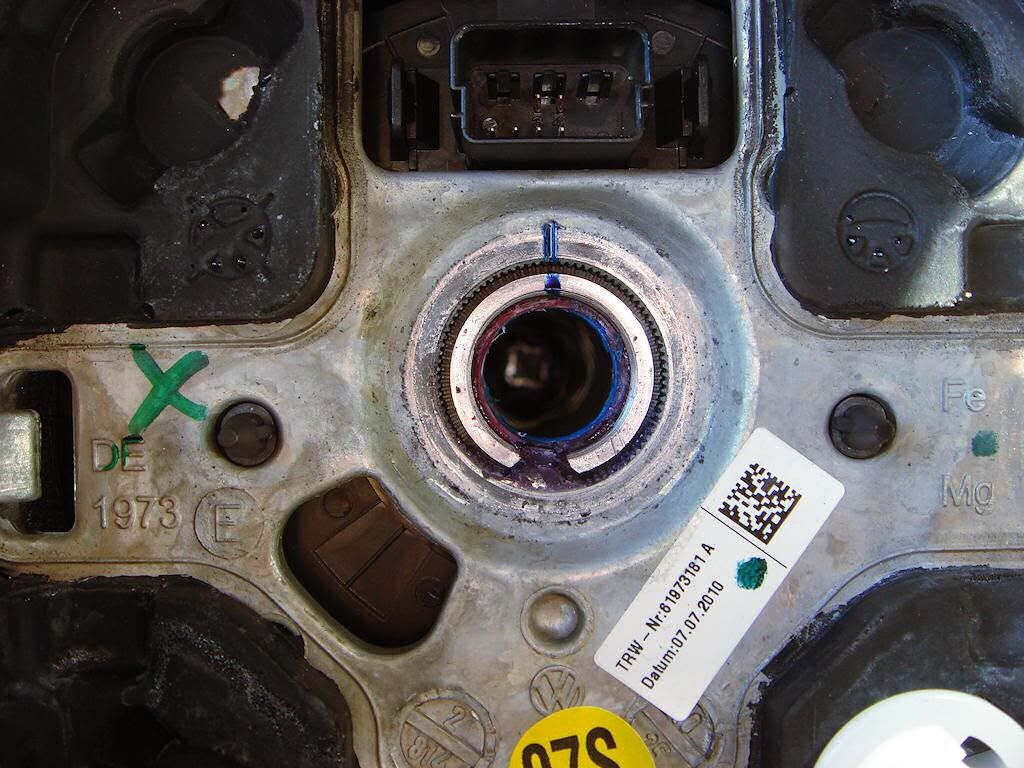
Store the old airbag in a safe place WITH THE VW LOGO UP! If stored the other way up, should the airbag ignite for some reason, you have a potentially lethal projectile!
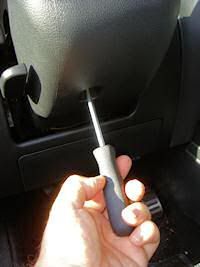
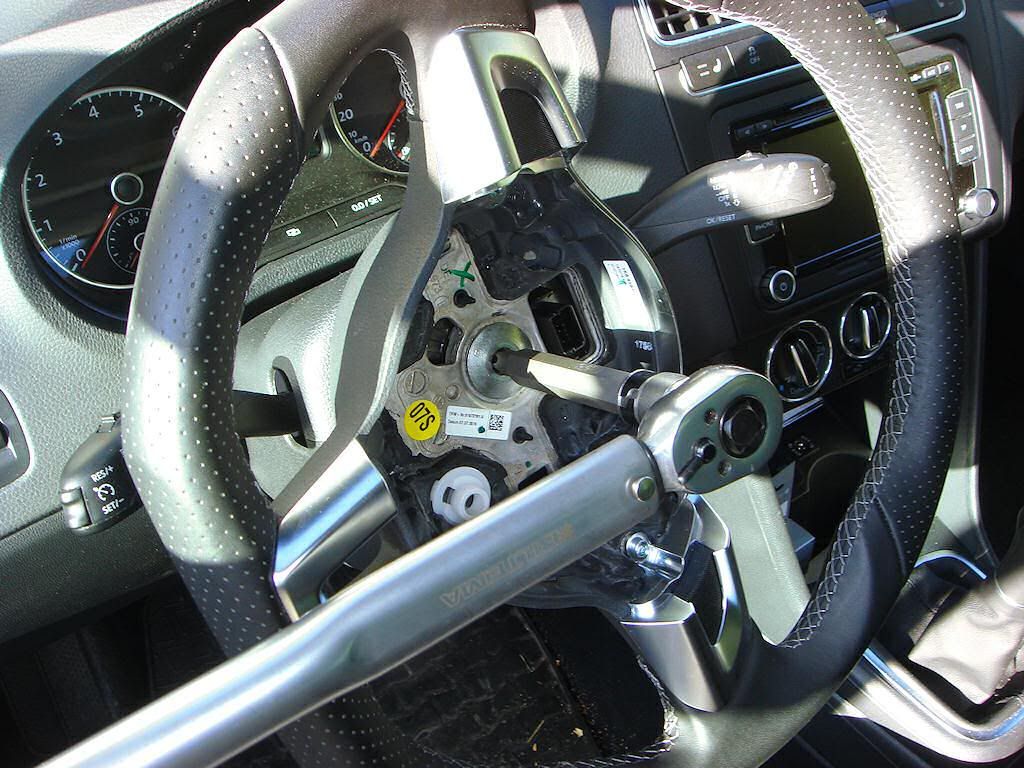
Undo the steering wheel mounting bolt. If you don't have the special 12-star bit, a regular six-star Torx bit (T55) will do just fine.
Turn the wheels and steering wheel back to straight-ahead position. Always a good practice to mark the position of the steering wheel in relation to the end of the steering axle, even if you weren't to mount the same wheel back on this car.
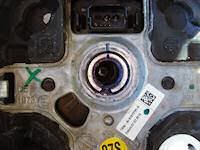
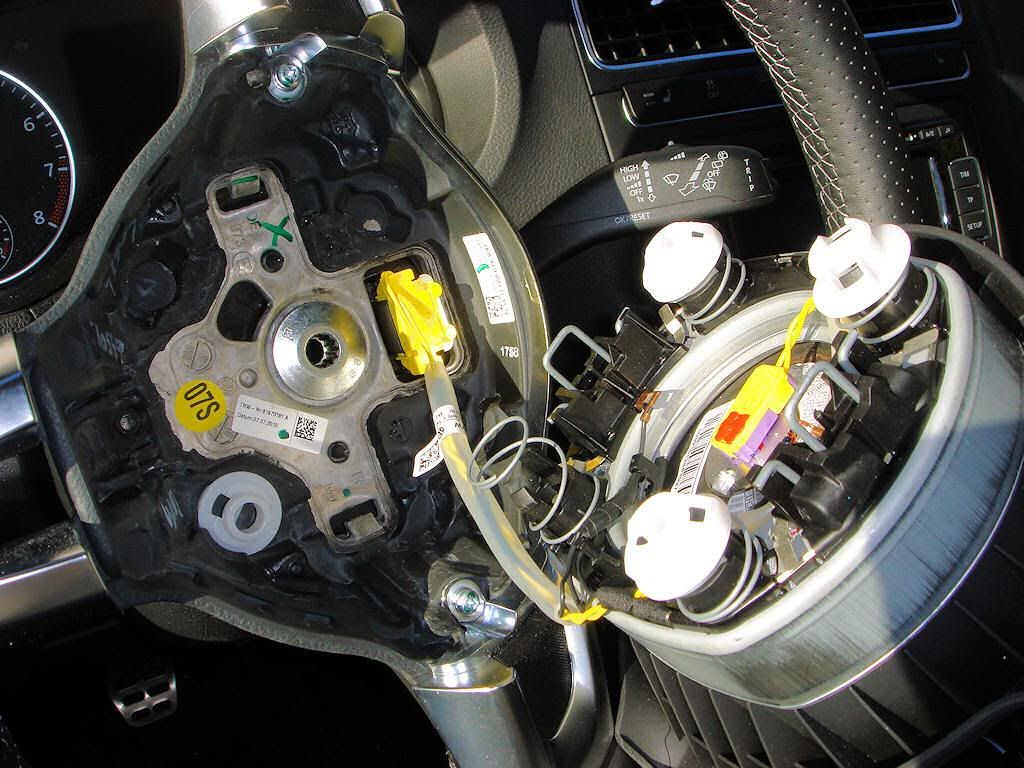
Pull the steering wheel free from the splines on the steering axle.
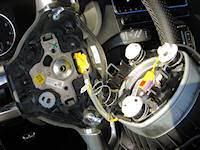
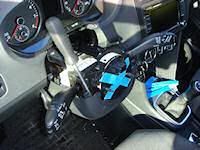
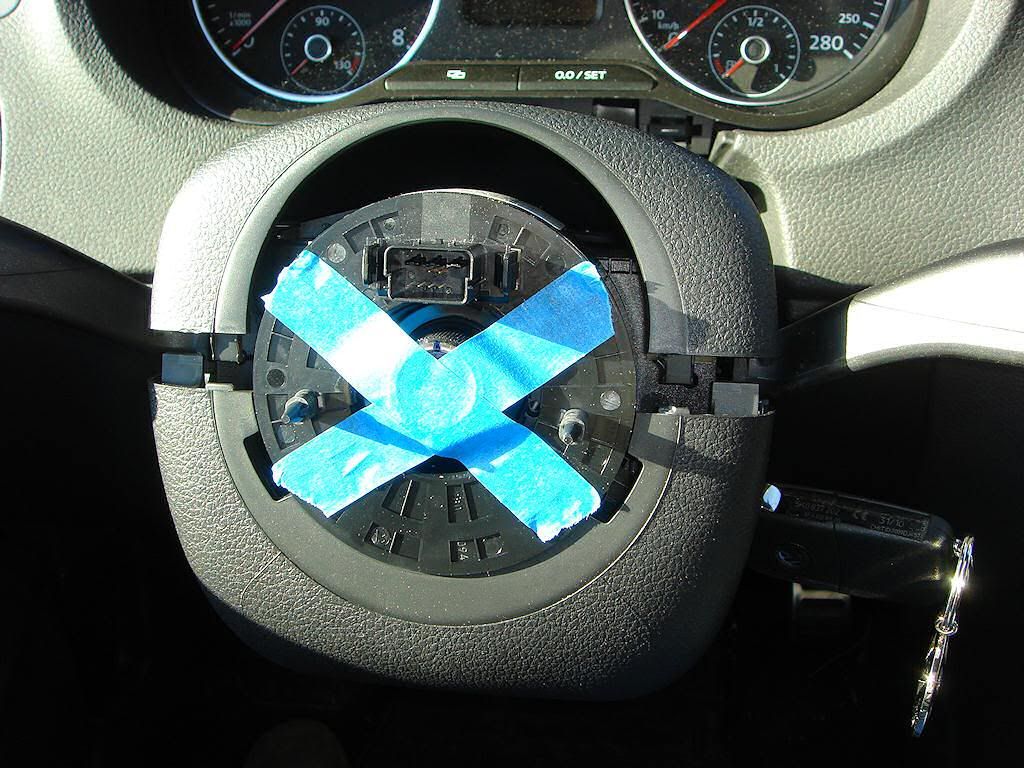
Now you can see the airbag slip ring that makes all the electrical connections to the steering wheel. Avoid spinning the slip ring, otherwise you might lose its central position, which could lead to the ribbon cable getting destroyed the next time you turn the steering to full lock. Use tape to "lock" the slip ring to this central position.
---------------------------------------
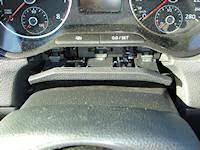
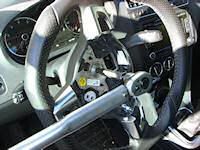
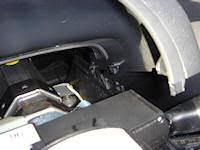
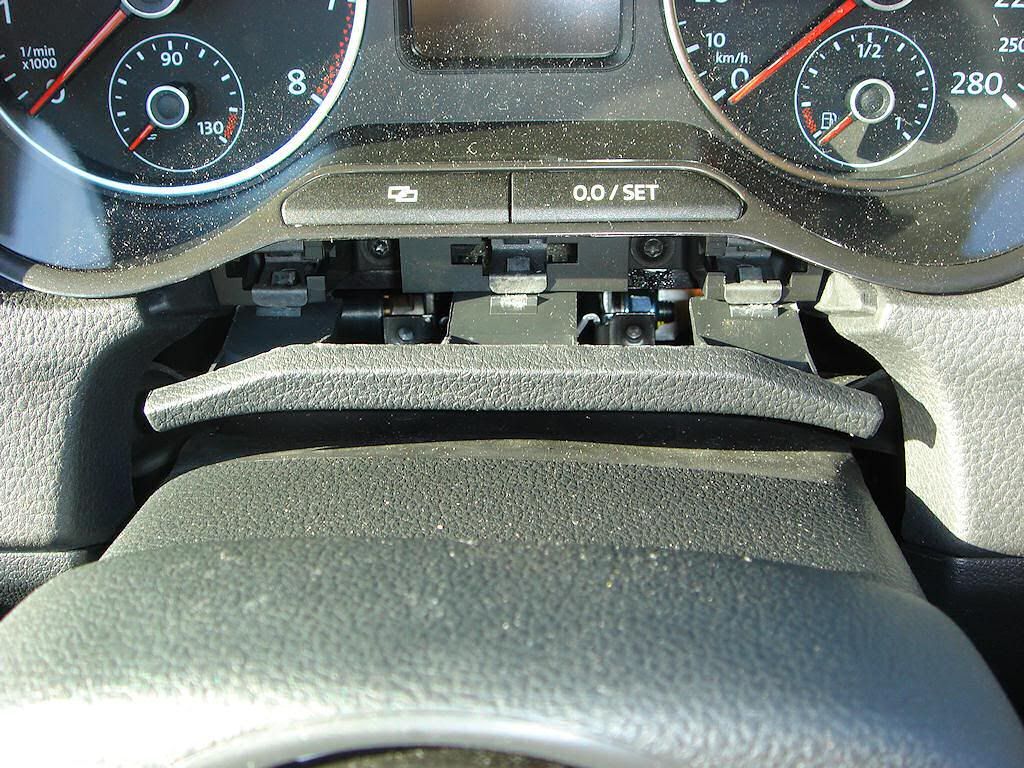
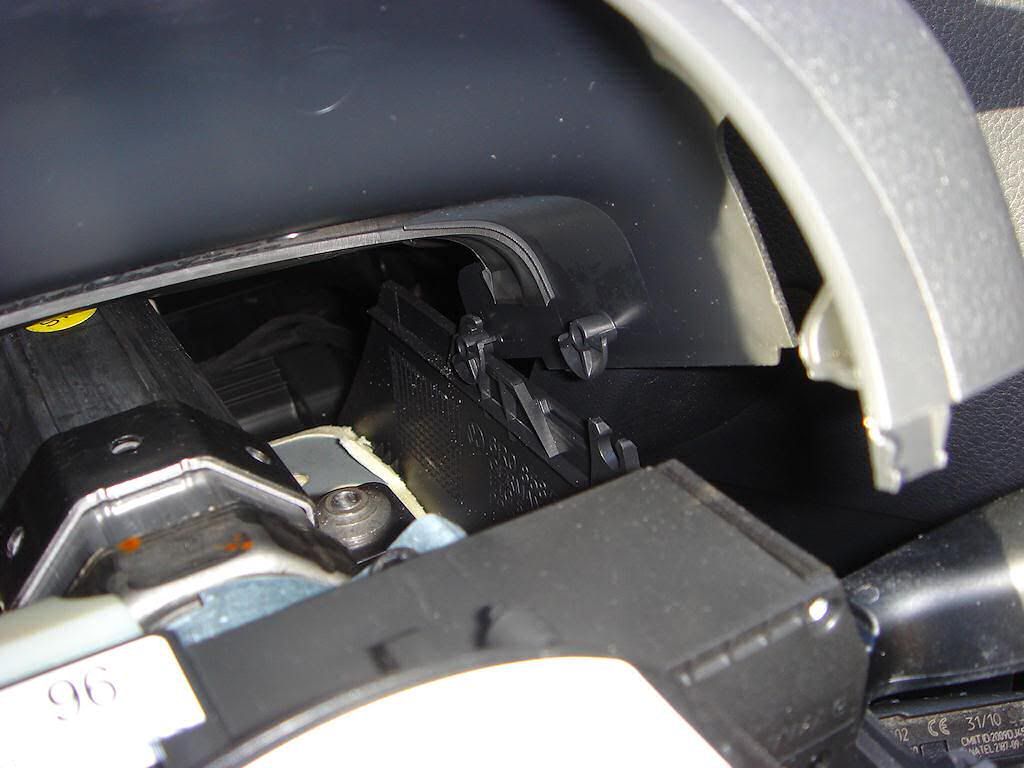
Lock the steering wheel height adjustment to its lowest position. Pull out the trim piece under the instrument panel, it's held with three clips.
Push the steering column upper trim half from both sides as shown to unclip it from the lower trim half.
The upper trim half should pop up as shown.
The front end of the upper half remains still "hinged" to the lower half. Free the upper half from the lower half completely by "un-hinging" the front end (just lift up).
Remove the lower trim half: Undo the mounting screws (T20) on both sides, accessible from above.
One more mounting screw (T20) beneath.
Now you can remove the lower trim half.
NB: I live in Finland where cars are left-hand-drive, so all pics and instructions apply to an LHD car. An RHD car can very probably be retrofitted in a similar fashion, but there might be an easier/cleverer place to connect one of the extra wires in an RHD car. More on this further down these instructions.
You can retrofit a standard Polo MFSW with just the buttons on the left spoke, or you can use a flat-bottom MFSW from a Golf/Scirocco that has the buttons on both spokes. Or, if you have a standard Polo with the DSG gearbox, then retrofit a Polo GTI MFSW with the gearchange paddles and those will work too! (I can't provide coding help for the latter, but I know it can be done.)
Please note these restrictions and requirements:
- the airbag from a basic round buttonless steering wheel of a standard non-GTI Polo DOES NOT PHYSICALLY FIT into a MFSW of either shape! Therefore you must also get a new airbag and airbag wiring loom suitable for the MFSW.
- two extra wires must be added to the car's electrical system
- software coding (using e.g. VCDS) is needed to get the MFSW buttons and horn to function
One of the extra wires needed is for the LIN bus that the SW button control module needs to "talk" with other systems of the car. This wire runs from the airbag slip ring / stalk switch connector (T41, pin 10) behind the steering wheel. It's other end goes to the Central Electronics Control Module box J519 (white connector T73b, pin 17).
The other extra wire brings continuous +12V to the steering wheel, and runs from the airbag slip ring / stalk switch connector (T41, pin 9). The other end is originally connected to the fusebox, fourth fuse (SB4, 2A) from the left in the upper row. Unfortunately in my case that position was empty, didn't ven have the"claws" that hold a fuse. So I had to find an alternative place to connect the other end of that wire to. The easiest place (in an LHD car at least) is the light switch connector's pin 15.
All clear? Oh well, that's quite alright. Let's begin anyway:
---------------------------------------
Parts, tools and accessories needed, for example:
- MFSW with buttons
- buttons control module with appropriate wiring
- airbag suitable for MFSW
- airbag wiring loom (5K0 971 584 A) with connector for buttons control module
- repair wire (000 979 009 E) with pins suitable for slip ring / stalk switch connector
- 0.35...0.5sqmm wire to extend repair wire
- shrink tubing to insulate wire connections
- Torx screwdriver T20 (and optionally T25)
- Torx bit T55
- torque wrench
- tools to make electrical connections (soldering iron, cutting pliers etc.)
- bandage, tranquilisers...
---------------------------------------

Disconnect the battery earth cable (-).
Insulate the end of the loose cable so that it doesn't conduct electricity, should it for any reason touch the battery minus pole. Before moving on to remove the airbag, wait for at least 15 minutes for any electrical charges in the car's component to discharge.
Sit in the car and touch the metallic door lock counterpiece on the B-pillar, to discharge any electrical charging you might have stored in your clothing. This is to rule out even the remotest theoretical possibility that the potential difference could make the airbag go bang.
Turn the steering wheel 90 degrees from the straight-ahead position.
Use a mirror to see a hole on the back of the stering wheel. In that hole you can see one of the airbag retaining loops.
Use a flathead screwdriver to lever the retaining loop around the stud on the steering wheel. Simultaneously, pull from the edge of the airbag towards you.
Next, turn the steering wheel 180 degrees and undo the retaining loop on the other side. Then the airbag is free (apart from the wiring).
Hold the airbag in your other hand to prevent it hanging from the wiring. Undo the yellow connector that goes to the slip ring. Pull the white locking piece towards you to free the connector.
Store the old airbag in a safe place WITH THE VW LOGO UP! If stored the other way up, should the airbag ignite for some reason, you have a potentially lethal projectile!
Undo the steering wheel mounting bolt. If you don't have the special 12-star bit, a regular six-star Torx bit (T55) will do just fine.
Turn the wheels and steering wheel back to straight-ahead position. Always a good practice to mark the position of the steering wheel in relation to the end of the steering axle, even if you weren't to mount the same wheel back on this car.
Pull the steering wheel free from the splines on the steering axle.
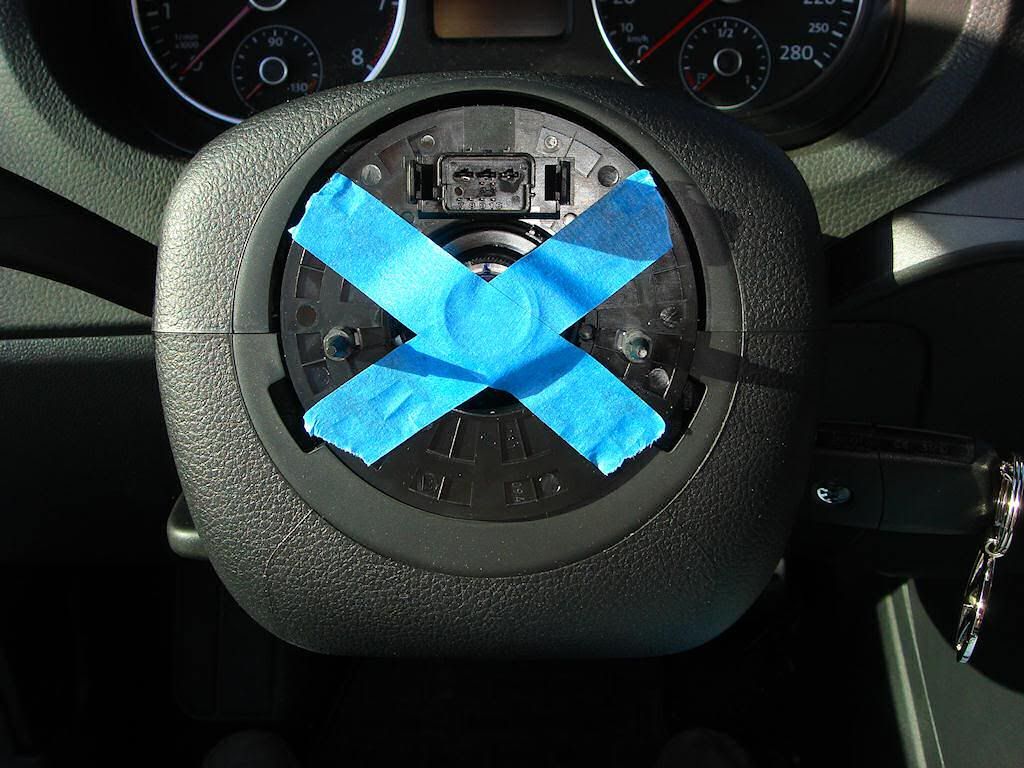
Now you can see the airbag slip ring that makes all the electrical connections to the steering wheel. Avoid spinning the slip ring, otherwise you might lose its central position, which could lead to the ribbon cable getting destroyed the next time you turn the steering to full lock. Use tape to "lock" the slip ring to this central position.
---------------------------------------
Lock the steering wheel height adjustment to its lowest position. Pull out the trim piece under the instrument panel, it's held with three clips.

Push the steering column upper trim half from both sides as shown to unclip it from the lower trim half.
The upper trim half should pop up as shown.
The front end of the upper half remains still "hinged" to the lower half. Free the upper half from the lower half completely by "un-hinging" the front end (just lift up).

Remove the lower trim half: Undo the mounting screws (T20) on both sides, accessible from above.

One more mounting screw (T20) beneath.
Now you can remove the lower trim half.