Page 1 of 2
[Tutorial] Multi function display for cheap
Posted: Mon Apr 13, 2020 2:44 pm
by amer6R
At bottom of the page tutorial
I've been re-searching a bit for MFD options, i know that it can be coded out with VCDS, that's not the problem, problem is the button/switch on stalks. But digging a a bit on the forum i have found this.
https://www.aliexpress.com/item/32577003507.html
Witch is basically a button and two wires and that is pretty easy to source ( and cheap)
But I don't understand their instructions at all.
Multifuction Instrument Cluster upgraded Kit for VW VOLKSWAGEN POLO JETTA SANTANA SKODA FABIA RAPID
PACKING LIST : 5053 + 2 Switches with cables
All Low version cars can be upgraded. It can be installed easily, do not need to disasembled the sterring wheel, just remove the instrument cluster!
Found 21 meter insert 32-pin plug on the line! 21 is on the turn 22 next turn 23 is reset! We can plug in a 21 cycle flip it! Then brush with 5053 computer code, into the original coding 140200 17 dashboard can be changed 140A00
But I don't understand their instructions at all. Can someone explain and maybe check if this could be done ( in ELSA via circuit diagram ?)
So pin 21 is (nex next function for board ?) /// Basically one wire from switch to pin 21, other to ground ?
Pin 23 is Reset / OK - This would require another switch - but in my case i wouldn't need this option
What i found:
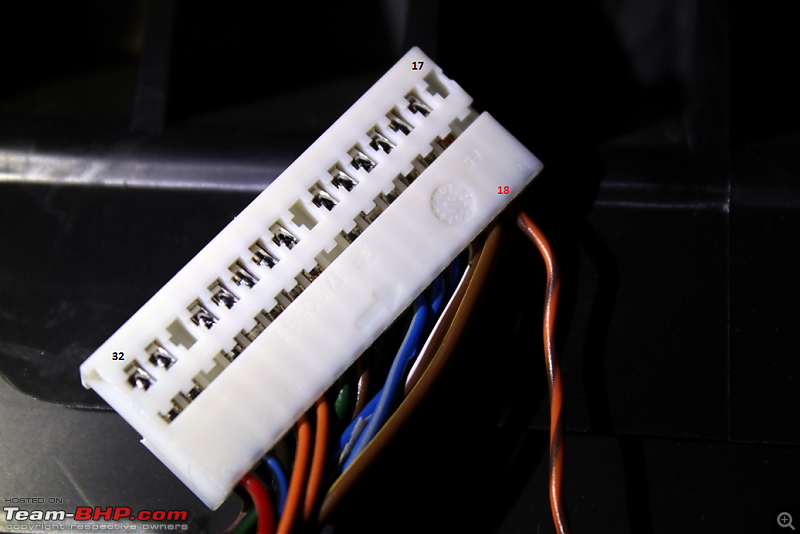
Cluster pinout:
Than this topic:
viewtopic.php?t=66992
 viewtopic.php?t=65096
Re: MFD for cheap?
Posted: Mon Apr 13, 2020 5:24 pm
by iichel
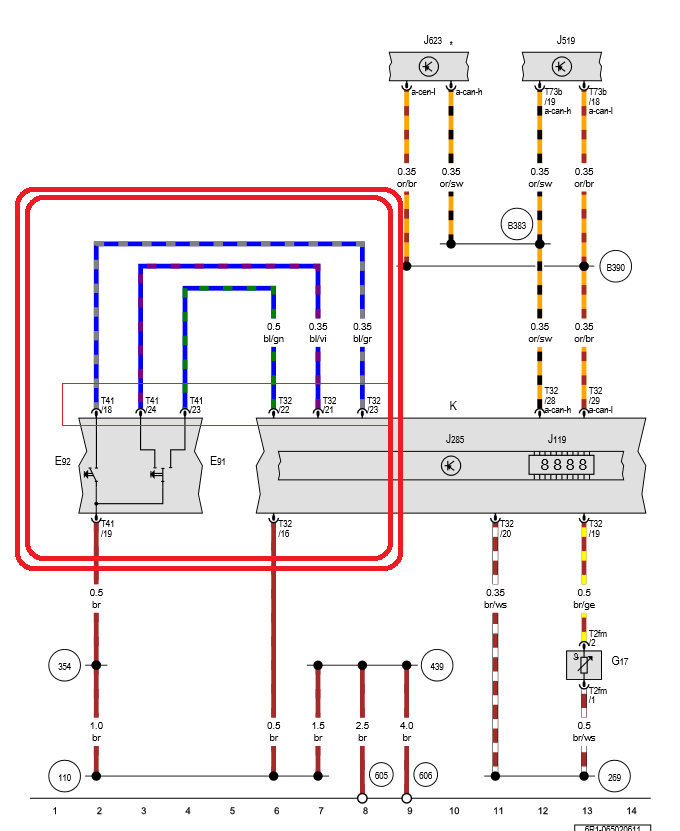
I'd suggest to change the stalks and add the the wires as shown in your wiring diagram (the one with the big square drawn in it).
Re: MFD for cheap?
Posted: Tue Apr 14, 2020 9:32 am
by amer6R
Stalks not worth of upgrade for my car
Sent from my Nokia 6.1 Plus using Tapatalk
Re: MFD for cheap?
Posted: Tue Apr 14, 2020 3:10 pm
by Damon
That looks interesting actually.
Intrigued to hear more as was considering upgrading stalks.
Re: MFD for cheap?
Posted: Tue Apr 14, 2020 3:37 pm
by amer6R
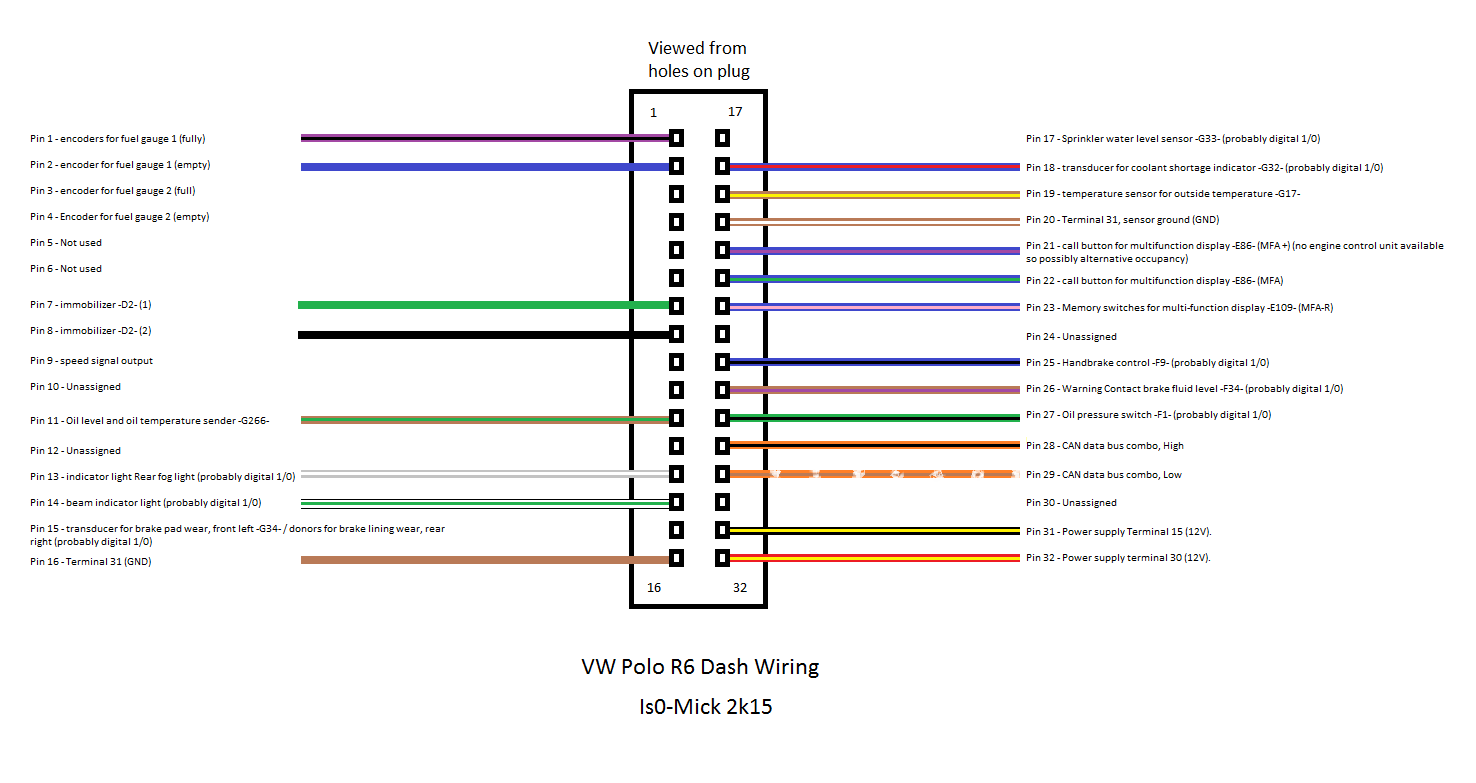
Well it seems in this diagram
(cluster connector) pin T32/16 is ground, and on stalk switch - T41/19 is also ground - Grounding the switch.
I think it should work, but I'm not sure where to connect the button to pin 22, 21, or 23
Basically if we choose a switch with up and down fuction ( we would get the one for trip), and third one for ok/reset.
- It confuses me the meaning "call button" pin 21-22 ( these should be next menu, previous menu)
-Pin 23 memory? - i think this one goes to ok-reset
I think this is correct from the diagram!
Re: MFD for cheap?
Posted: Tue Apr 14, 2020 5:25 pm
by iichel
21 up
22 down
23 ok
You can make a contact to gnd to send the signal.
It's a very simple system, easy to emulate with non OEM buttons
Re: MFD for cheap?
Posted: Tue Apr 14, 2020 5:34 pm
by amer6R
iichel wrote: Tue Apr 14, 2020 5:25 pm
21 up
22 down
23 ok
You can make a contact to gnd to send the signal.
It's a very simple system, easy to emulate with non OEM buttons
yeah that confirms my thoughts, just now to find 000 979 009 pin terminals in this lockdown
Re: MFD for cheap?
Posted: Wed Apr 15, 2020 7:10 pm
by amer6R
Ok let me start. What you need is a button ( you can go with 1 button, two or three).
One for next, one for back and one for ok
If you want 3 buttons you will need 4 wires.

To one pole of a button goes ground wire, and to other wire to corresponding pin.
I went with two buttons, and i used a jumper wire from one button to other
I took out one blank button and drilled two 8mm holes

Solder wires to buttons, and screw them in the blank switch.

I used Tesa wire loom tape to make it look OEM-ish and to stop wires from ratteling .

I removed the cluster, and radio. I pulled the wires from.the switch to the cluster.


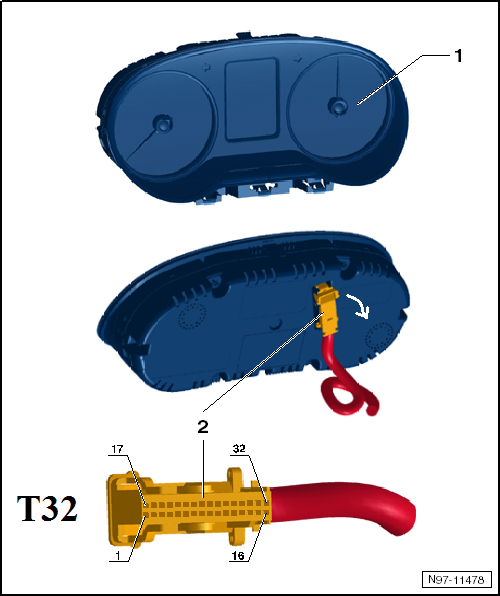
Once you pull your loom to the cluster area, you will need to open the connector of the cluster. Be careful to not break it. On connector its labeled 1-16
17-32

Insert the pins in connector, i left the reset button pin unused, cause i dont need it, but its in the loom i created.
Pin 21 & 22 next-back ; 23 - reset/ok
Remove the steering column trim, and find the ground bolt and ground you wire to it. (under the brown wire) Just unscrew the torx bolt a little bit and wrap your wire around and secure it down. Even better if you have a end connector on your wire like in OEM setup.

Now put everything back together.
Now you need to code it via VCDS
https://youtu.be/xGQEUWi47oE
In video coding procedure and live test of emulated buttons.

Re: [Tutorial] Multi function display for cheap
Posted: Sun Apr 26, 2020 5:55 pm
by Damon
Hey great work!
Quick one as it looks like you have the same/similar MFD. Cycling through the different displays are we able to get a big speedometer or is that not available?
Think I’m gonna do down the stalk route eventually
Re: [Tutorial] Multi function display for cheap
Posted: Tue Apr 28, 2020 8:15 am
by amer6R
Digital speedo reading? You get it but it isnt that big. ( Its the same height as fuel economy)
Maybe it could be scaled via adaptations? Im not sure, but i still didnt got the coolant temp reading, and i cant find it in adaptation channnel
Sent from my Nokia 6.1 Plus using Tapatalk
Re: [Tutorial] Multi function display for cheap
Posted: Tue Apr 28, 2020 8:25 am
by iichel
No you can't scale it via adaptations unfortunately and the coolant temperature is also not available on the 6R MFD.
Re: [Tutorial] Multi function display for cheap
Posted: Mon May 03, 2021 10:47 pm
by Atalv
That coding will work on vw polo 6c?
Re: [Tutorial] Multi function display for cheap
Posted: Wed May 19, 2021 7:38 pm
by bollegti
amer6R wrote: Mon Apr 13, 2020 2:44 pm
At bottom of the page tutorial
I've been researching a bit for MFD options, i know that it can be coded out with VCDS, that's not the problem, problem is the button/switch on stalks. But digging a a bit on the forum i have found this.
https://www.aliexpress.com/item/32577003507.html
Witch is basically a button and two wires and that is pretty easy to source ( and cheap)
But I don't understand their instructions at all.
Multifuction Instrument Cluster upgraded Kit for VW VOLKSWAGEN POLO JETTA SANTANA SKODA FABIA RAPID
PACKING LIST : 5053 + 2 Switches with cables
All Low version cars can be upgraded. It can be installed easily, do not need to disasembled the sterring wheel, just remove the instrument cluster!
Found 21 meter insert 32-pin plug on the line! 21 is on the turn 22 next turn 23 is reset! We can plug in a 21 cycle flip it! Then brush with 5053 computer code, into the original coding 140200 17 dashboard can be changed 140A00
But I don't understand their instructions at all. Can someone explain and maybe check if this could be done ( in ELSA via circuit diagram ?)
So pin 21 is (nex next function for board ?) /// Basically one wire from switch to pin 21, other to ground ?
Pin 23 is Reset / OK - This would require another switch - but in my case i wouldn't need this option
What i found:
Cluster pinout:
Than this topic:
viewtopic.php?t=66992
viewtopic.php?t=65096
Hi guys, can someone show me a picture where I have to plug those three wires from cluster pin 21 22 23 to T41 connector, I'm not sure where I should put them.
Re: [Tutorial] Multi function display for cheap
Posted: Thu May 20, 2021 10:39 am
by amer6R
Cluster pin 21 to pin 24
Cluster 22 to 23
Cluster 23 to 18
T41 is labeled, just count the spots
Re: [Tutorial] Multi function display for cheap
Posted: Tue Jun 22, 2021 1:54 pm
by giannis20vt
Atalv wrote: Mon May 03, 2021 10:47 pm
That coding will work on vw polo 6c?
I have the same question. Could someone give us a hint please ?