LED rear light kit progress

Chat about your MKV (6N2) Polo GTi
tegwin
Gold Member
Posts: 945
Joined: Mon Nov 13, 2006 5:14 pm
Location: Malvern, Worcestershire

LED rear light kit progress

Post by tegwin »

After my origional thread asking if people might be interested in an LED upgrade kit for the rear light clusters I have come up with a viable solution.


First off, my solution...

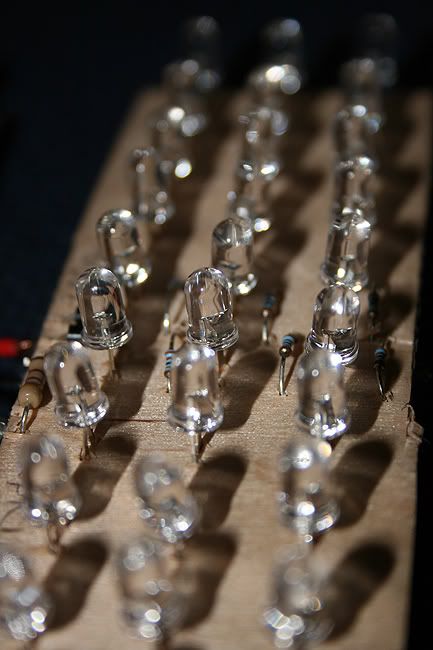
Each light cluster will require three sepperate printed circuit boards (Brake, Indicator, sidelight), each with 30 ultrabright long life LEDs [30,000 Millicandellas for 1,000,000 hours].

The boards vary in size, so the brakelight (at the top) is the smallest, followed by the indicator (Second down), finaly, the largest board is the sidelight....All boards have 30 LEDs with different spacing on each board.
Image

Image


First off, the brakelights.... When you press the brake pedal, the brake AND sidelight LEDs light up with maximum brightness.
Image


When you switch on the sidelights, the sidelight LEDs illuminate with 50% of their total intensity (Which is fractionally brighter than the standard bulb) [Its hard to photograph the lights...they do all light up to the same intensity and are evenly spaced...it just doesnt look like it in this picture!)
Image

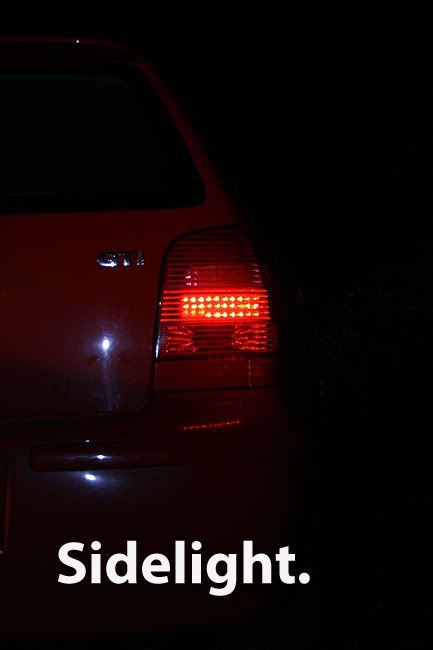
Then, when you press the brake, the brakelight comes on, and the sidelight brigtness goes up to 100% (In reality you can see the sepperate LEDS inside the lights, its just hard to capture on film)
Image
(Both of the above photos were taken using the same shutter speed on the camera, so show a good representation of the relative brightnes of brake and sidelight)

The indicators are used at 100% brightness and are similar brightness to the standard bulb...They do however give the added benefit of flashing on and off nice and sharp rather than slowly warming up, and cooling down like the conventional bulbs do. The indicators also have the same evenly spaced 'LED' pattern as the sidelights and brakes when viewed from behind.

Due to the high cost of the Philips superbright LEDs(just over 20p each)....The final price for each of the boards will be £9.00

Each board is photo-etched onto a glass reinforced plastic board providing a rigid and flameproof base on which to solder all of the components.

£9.00 would buy you one (1) complete printed circuit board with 30 LEDs soldered into place, fully tested with wires and connectors all ready to drop into your light clusters. I will include photographic instructions for installation..All you need is an 8mm spanner, a hacksaw blade, some araldite (or similar) and about an hour.

If you wanted all 6 boards together (2x brake, 2x indicator, 2xSidelight/brake) the total cost would be £54.

By doing it this way, you can pick and choose which lights you want converted to LED and which you want left standard.


I have also considered an LED conversion for the foglights, but this would cost slightly more than £9 per board, so unless anyone really wants this, I wont be producing any.

Likewise if anyone wanted the LEDs layed out in a different pattern, or didnt want the sidelights to act as brakes, or fancied something slightly different, I would be happy to help.

Would this kit be of interest to anyone?
MaxZ
Platinum Member
Posts: 1472
Joined: Mon Apr 10, 2006 10:20 am
Location: North London
Contact:

Post by MaxZ »

definitely of interest, the only thing is could you do the kit without the sidelight becoming a brake light. It's just down to personal preference. Also what would the total cost be for a complete set?
Thanks
tegwin
Gold Member
Posts: 945
Joined: Mon Nov 13, 2006 5:14 pm
Location: Malvern, Worcestershire

Post by tegwin »

Yes, there is a connector you can remove that disconects the extra brakelight from the sidelight LEDs. (So should you wish to have the extra brakelight occasionaly, its relativley easy to swich it over)

For all 6 Boards (2x brake, 2x indicator, 2xSidelight) complete with instructions and connectors, the cost would be £54 plus postage. (Although the first person to buy a complete kit gets free postage)
MaxZ
Platinum Member
Posts: 1472
Joined: Mon Apr 10, 2006 10:20 am
Location: North London
Contact:

Post by MaxZ »

How simple is the installation, that's what's worrying me the most. Someone very clumsy like me would have serious troubles
ModifiedMadness
Sponsor
Posts: 6769
Joined: Tue Jun 14, 2005 8:38 pm
Location: Bedford Drives: MK5 Golf R32

Post by ModifiedMadness »

As above :D
tegwin
Gold Member
Posts: 945
Joined: Mon Nov 13, 2006 5:14 pm
Location: Malvern, Worcestershire

Post by tegwin »

(I will include complete and detailed step by step photo instructions with any parts bought from me so you know exactly what to do with the bits...and if in doubt, im always around on here to ask :roll:)

But basically...

Unscrew three 8mm nuts from the back of each light cluster and remove the cluster complete with bulb holder... (getting the wire plug off is a bit of a fidle until you figure out where to squeeze)


Unclip the bulb holder from the light cluster...

Take a hacksaw blade and carefully cut three square holes in the back of each light cluster (roughly 3" square) (I will include exact details of how much to cut and where!)

Once the holes are the right size, you can slot the Printed circtuit boards (PCBs) in through the holes and position them where you want them and stick in place with a couple of blobs of araldite or hot glue.... (I have used foam to "wedge" the prototype boards inside my clusters so I can pull them out to make changes...you could do the same until you are happy you have the position right...

Once the LED boards are inplace you clip the bulb holder back inplace minus the bulbs and simply plug the leads from the LEDs into the appropriate slot on the distrabution board (as per the instructions)

Then stick it back in the car...Simple...


The fiddliest part is cutting the holes in the back of the light units...Just takes patience and a bit of care....

If you are worried about doing it you could always stick your lights in the post (Or come and see me) and I will do it for you for a few bob...But thats a bit extreme...its really not that hard! (Just take care not to scratch the bit that people can see!)
MaxZ
Platinum Member
Posts: 1472
Joined: Mon Apr 10, 2006 10:20 am
Location: North London
Contact:

Post by MaxZ »

Where are you based? Also I reckon you would be providing a great service if you manage to get to the few shows in the coming time.
tegwin
Gold Member
Posts: 945
Joined: Mon Nov 13, 2006 5:14 pm
Location: Malvern, Worcestershire

Post by tegwin »

Im based in Malvern, Worcestershire.

I guess I could bring a few sets to some shows and fit them for people if thats what they want....When are the next shows?
User avatar
alexperkins
Site Admin
Posts: 14873
Joined: Sat Nov 11, 2006 5:29 pm
Drives: 91 Golf GTI, 01 TT 225, 54 T5 174
Location: Poole, Dorset, UK.
Contact:

Post by alexperkins »

Looking good there - the only thing that would get on my nerves is that the sidelight setup doesnt fill the whole reflector. The inch gap is a little irriating in my opinion (but i am a perfectionist!!)

What do the indicators look like?
tegwin
Gold Member
Posts: 945
Joined: Mon Nov 13, 2006 5:14 pm
Location: Malvern, Worcestershire

Post by tegwin »

Yes, the gap annoys me aswell, But if the PCBs were any longer you would struggle to slide them into the cluster without doing damage to the bulb holder mountings which then gets annoying...

You could bend the LEDs on each end of the board over a bit so the light spreads a bit more to the edge of the clusters...

The indicators look like the sidelights but much brighter and yellow...I really like the way it has a crisp on/off...I will get a video tommorow if you like.
User avatar
alexperkins
Site Admin
Posts: 14873
Joined: Sat Nov 11, 2006 5:29 pm
Drives: 91 Golf GTI, 01 TT 225, 54 T5 174
Location: Poole, Dorset, UK.
Contact:

Post by alexperkins »

I see. Also could you shoot some pics of the back of the light unit with the boards installed - id be interested to see what theyre fitted like :)

Video would be gd ;) Cheers mate
tegwin
Gold Member
Posts: 945
Joined: Mon Nov 13, 2006 5:14 pm
Location: Malvern, Worcestershire

Post by tegwin »

Will sort video out tommorow..

Not much point in pics of the back of the unit...

With the bulb holder clipped inplace it looks totaly standard appart from 5 coloured wires... :wink:
User avatar
Tim_GTi
Post Whore
Posts: 12289
Joined: Mon Jun 25, 2007 6:31 pm
Location: Newport, South Wales
Contact:

Post by Tim_GTi »

this looks great, i'm definately interested! have to sort out my quite serious debt issues first however haha, but i'll be in touch soon 8)
User avatar
Tim_GTi
Post Whore
Posts: 12289
Joined: Mon Jun 25, 2007 6:31 pm
Location: Newport, South Wales
Contact:

Post by Tim_GTi »

oh yeh and forgot to add, how much will a full set be with postage included?
sorted
Gold Member
Posts: 794
Joined: Tue Apr 13, 2004 4:34 pm
Location: Glasgow

Post by sorted »

Highly recommend this to everyone...

The photos dont do it justice!

On another note - the boards i just used in mine (out a old set of hella lights - they have a large board like urs then this little add on bit about 1inch that is connect with 2 hard wires - i folded it onto of the main board to get it into the light - then bent it back so it was in line with the other main board - this meant it made it longer once inside the light - taking away the gap at the side .. i didnt explain that too well so will draw a picture 2morro!

Edit :

Rapid fast drawing but u get the idea...

Image

Image

EDIT.. i reckon you could fit 2 sidelight LEDS into the lights in less than 30 mins .. and i had no instructions - with instructions ur probably looking at 15 LOL
Last edited by sorted on Tue Dec 04, 2007 11:55 pm, edited 4 times in total.
Post Reply